使用GitHub Pages 与 Hexo 搭建个人博客站点(二)
前言
前一篇文章使用GitHub Pages 与 Hexo 搭建个人博客站点(一)介绍了如何使用 Hexo 从零开始搭建自己的博客站点,目前搭建起来的博客站点已经基本满足大部分同学的需要了,像是一些对外观要求极高的同学或许还是不满足于现状,想要定制更多的功能。本篇文章将继续介绍对 Next 主题的各种魔改。
开启版权声明
在 next 主题目录的配置文件中修改如下部分:1
2
3
4
5
6
7# Creative Commons 4.0 International License.
# https://creativecommons.org/share-your-work/licensing-types-examples
# Available: by | by-nc | by-nc-nd | by-nc-sa | by-nd | by-sa | zero
creative_commons:
license: by-nc-sa
sidebar: false
post: true
修改后的效果如下:
使用 GitTalk 实现评论功能
GitTalk 评论功能的基本原理是在 GitHub 上以开发者身份创建一个 GitHub Application 之后配置 Next,然后每新建一篇文章都会在 GitHub 代码库的 Issue 中新建一条 issue 用于存储该文章的评论内容。下面就让我们开始动手吧。。。
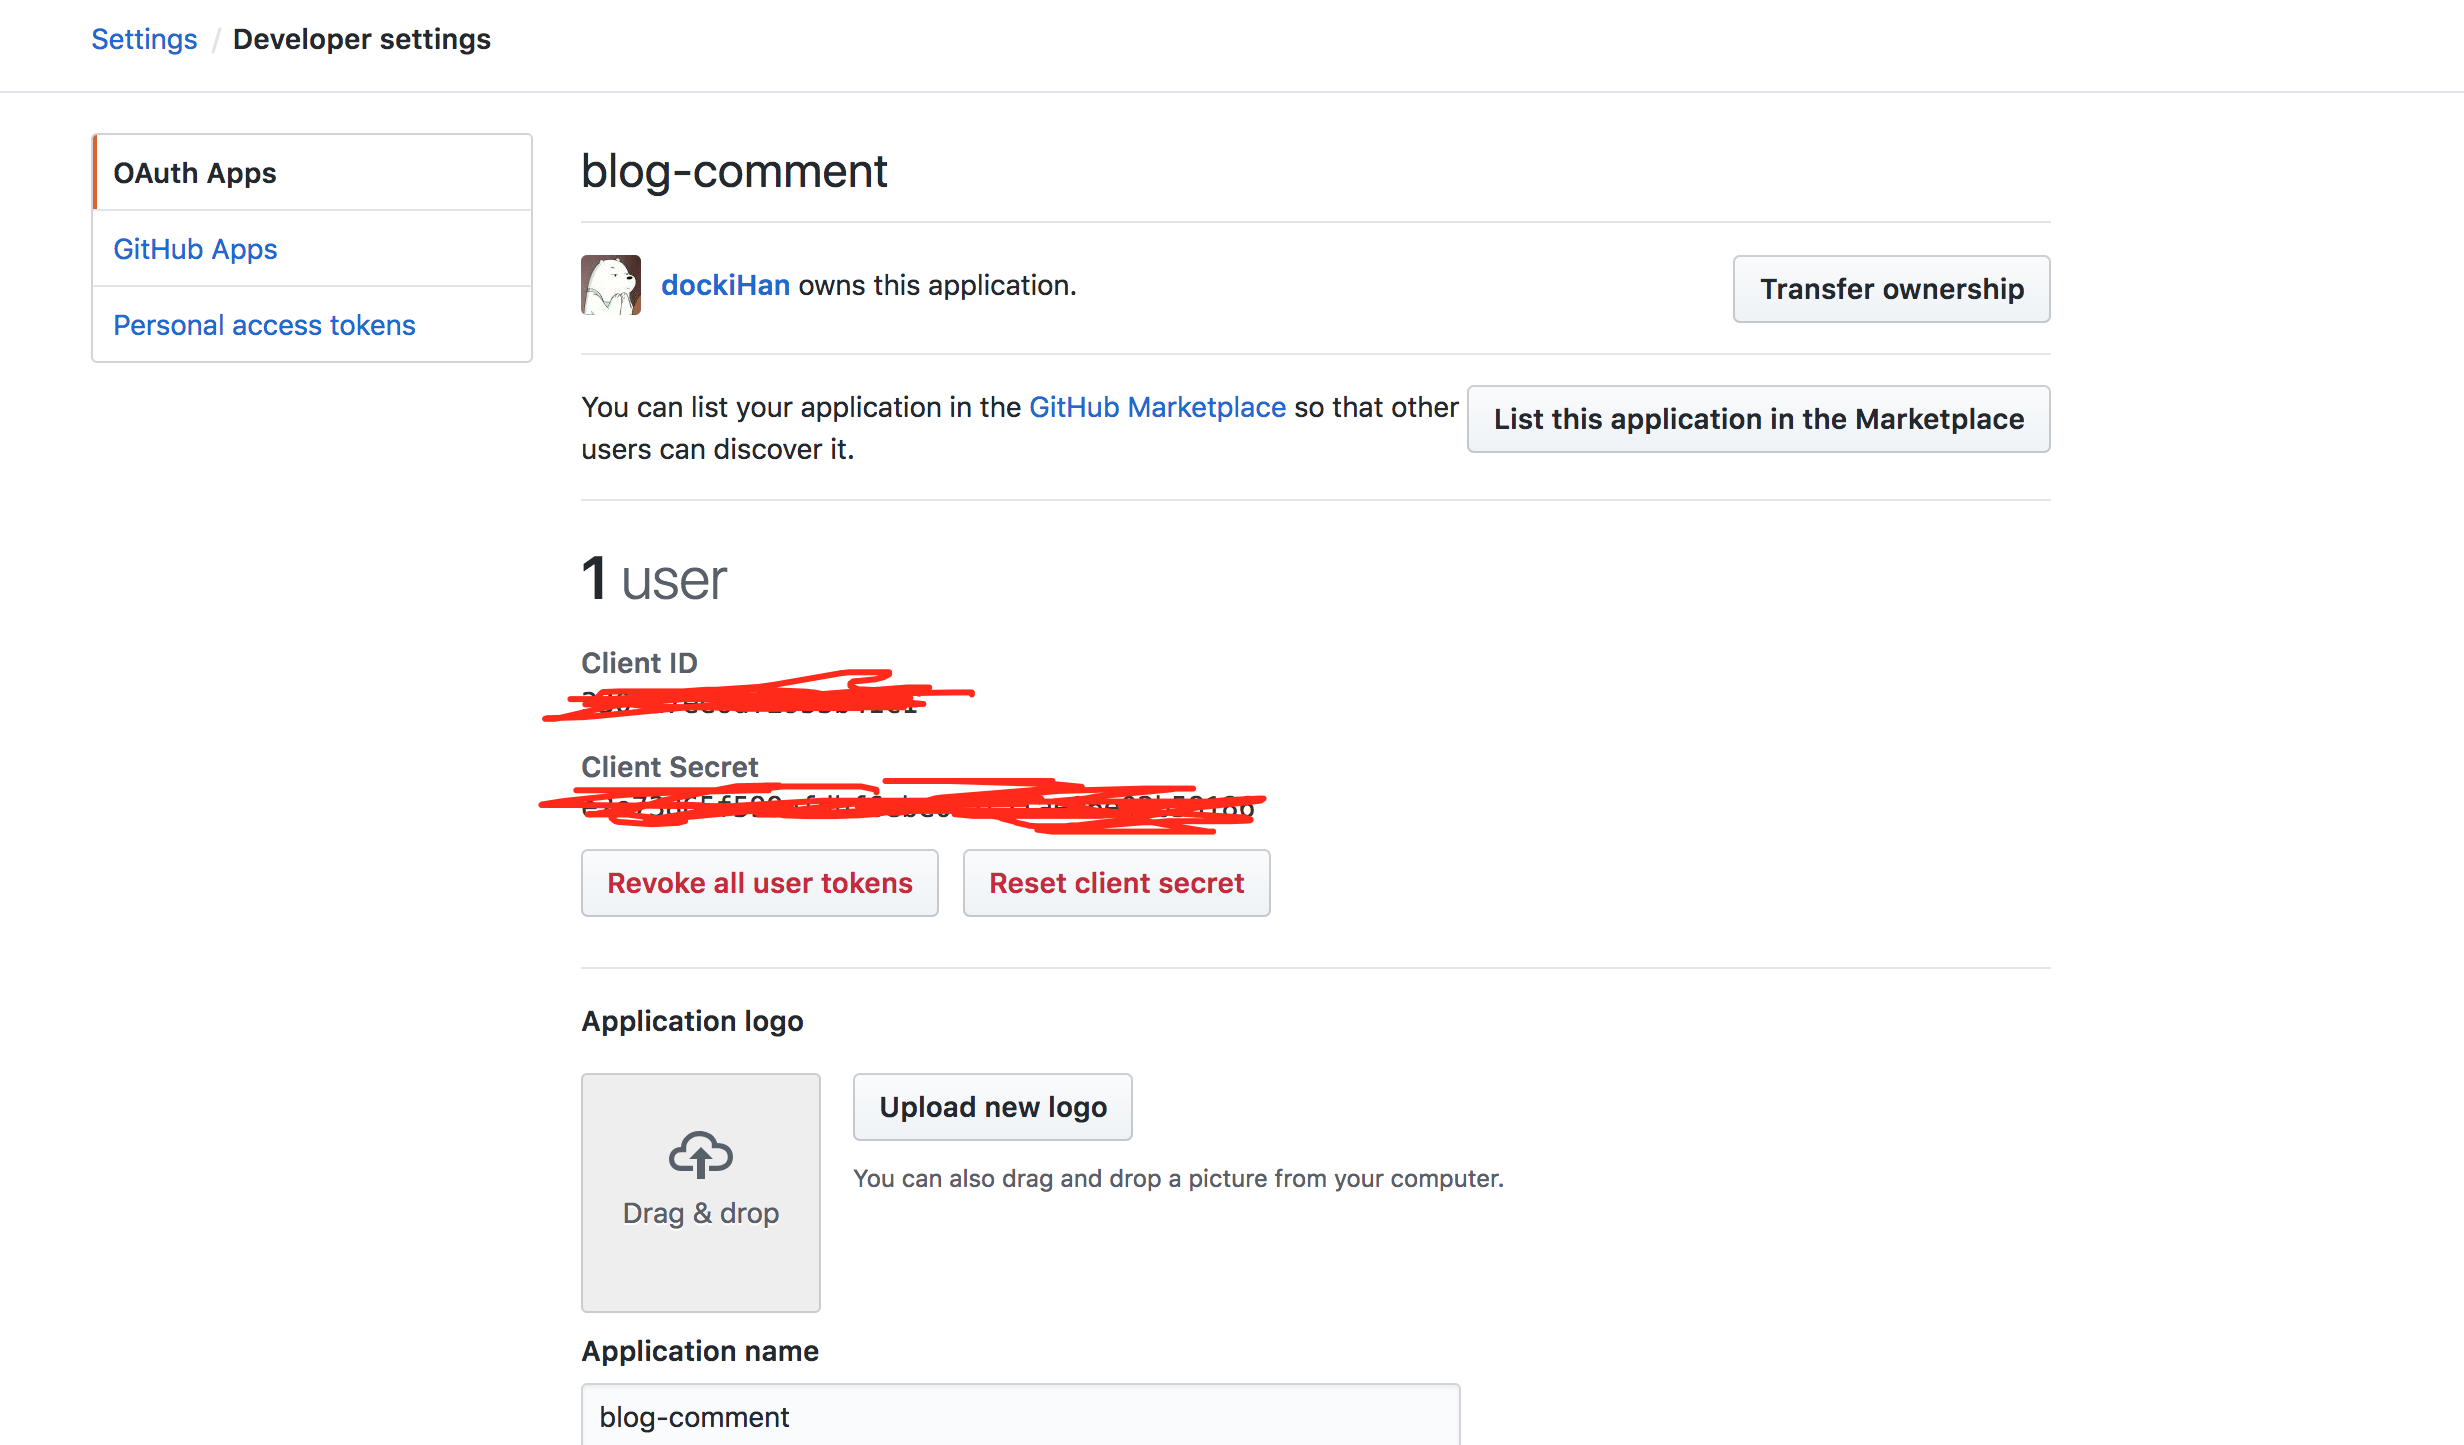
第一步,注册 OAuth application 传送门 其中 Application name 可以自取;Homepage URL 需要填写博客的 URL 地址,如:https://yourName.github.io/; Application description Authorization callback URL 同样填写博客的 URL
第二步,获取 Client ID 和 Client Secret 进入 GitHub,依次点击头像 –> Settings –> Developer settings 然后就可以看到刚刚创建的 OAuth Applcation 点击该App,在新的页面中就可以看到 Client ID 和 Client Secret,如下图:
第三步,修改 Next 配置文件
在 next 目录下的 _config.yml 文件中找到 gitalk 部分,做如下配置1
2
3
4
5
6
7
8
9
10
11# Gitalk
# Demo: https://gitalk.github.io
# Reference: https://asdfv1929.github.io/2018/01/20/gitalk/, https://liujunzhou.cn/2018/8/10/gitalk-error/#more
gitalk:
enable: true
github_id: dockiHan # Github repo owner
repo: dockiHan.github.io # Repository name to store issues.
client_id: # 第二步中的 Client ID
client_secret: #第二步中的 Client Secret
admin_user: # 第二步创建Applicationd时用的GitHub 的 userName
distraction_free_mode: true # Facebook-like distraction free mode第四步,修改 layout/_partials/comments.swig
添加以下内容1
2
3{% elseif theme.gitalk.enable %}
<div id="gitalk-container"></div>
<link rel="stylesheet" href="https://unpkg.com/gitalk/dist/gitalk.css">第五步,在 layout/_third-party/comments/目录下增加文件gitalk.swig 已存在的不必再新建,检查一下文件内容是否一致
添加以下的内容1
2
3
4
5
6
7
8
9
10
11
12
13
14
15
16
17
18
19
20
21{% if not (theme.duoshuo and theme.duoshuo.shortname) and not theme.duoshuo_shortname %}
{% if theme.gitalk.enable %}
{% if page.comments %}
<script src="https://unpkg.com/gitalk/dist/gitalk.min.js"></script>
<script type="text/javascript">
const gitalk = new Gitalk({
clientID: '{{theme.gitalk.clientID}}',
clientSecret: '{{theme.gitalk.clientSecret}}',
repo: '{{theme.gitalk.repo}}',
owner: '{{theme.gitalk.owner}}',
admin: '{{theme.gitalk.admin}}'.split(','),
id: '{{ page.date }}', #这个是基于文章时间创建 Issues ,默认是以文章标题作为标签创建 Issues 会导致长标题初始化失败。
pagerDirection: '{{theme.gitalk.pagerDirection}}',
// facebook-like distraction free mode
distractionFreeMode: false
})
gitalk.render('gitalk-container')
</script>
{% endif %}
{% endif %}
{% endif %}第六步,打开 layout/_third-party/comments/index.swig
添加以下内容1
{% include 'gitalk.swig' %}
第七步,将本地 build 分支的修改同步到远程分支
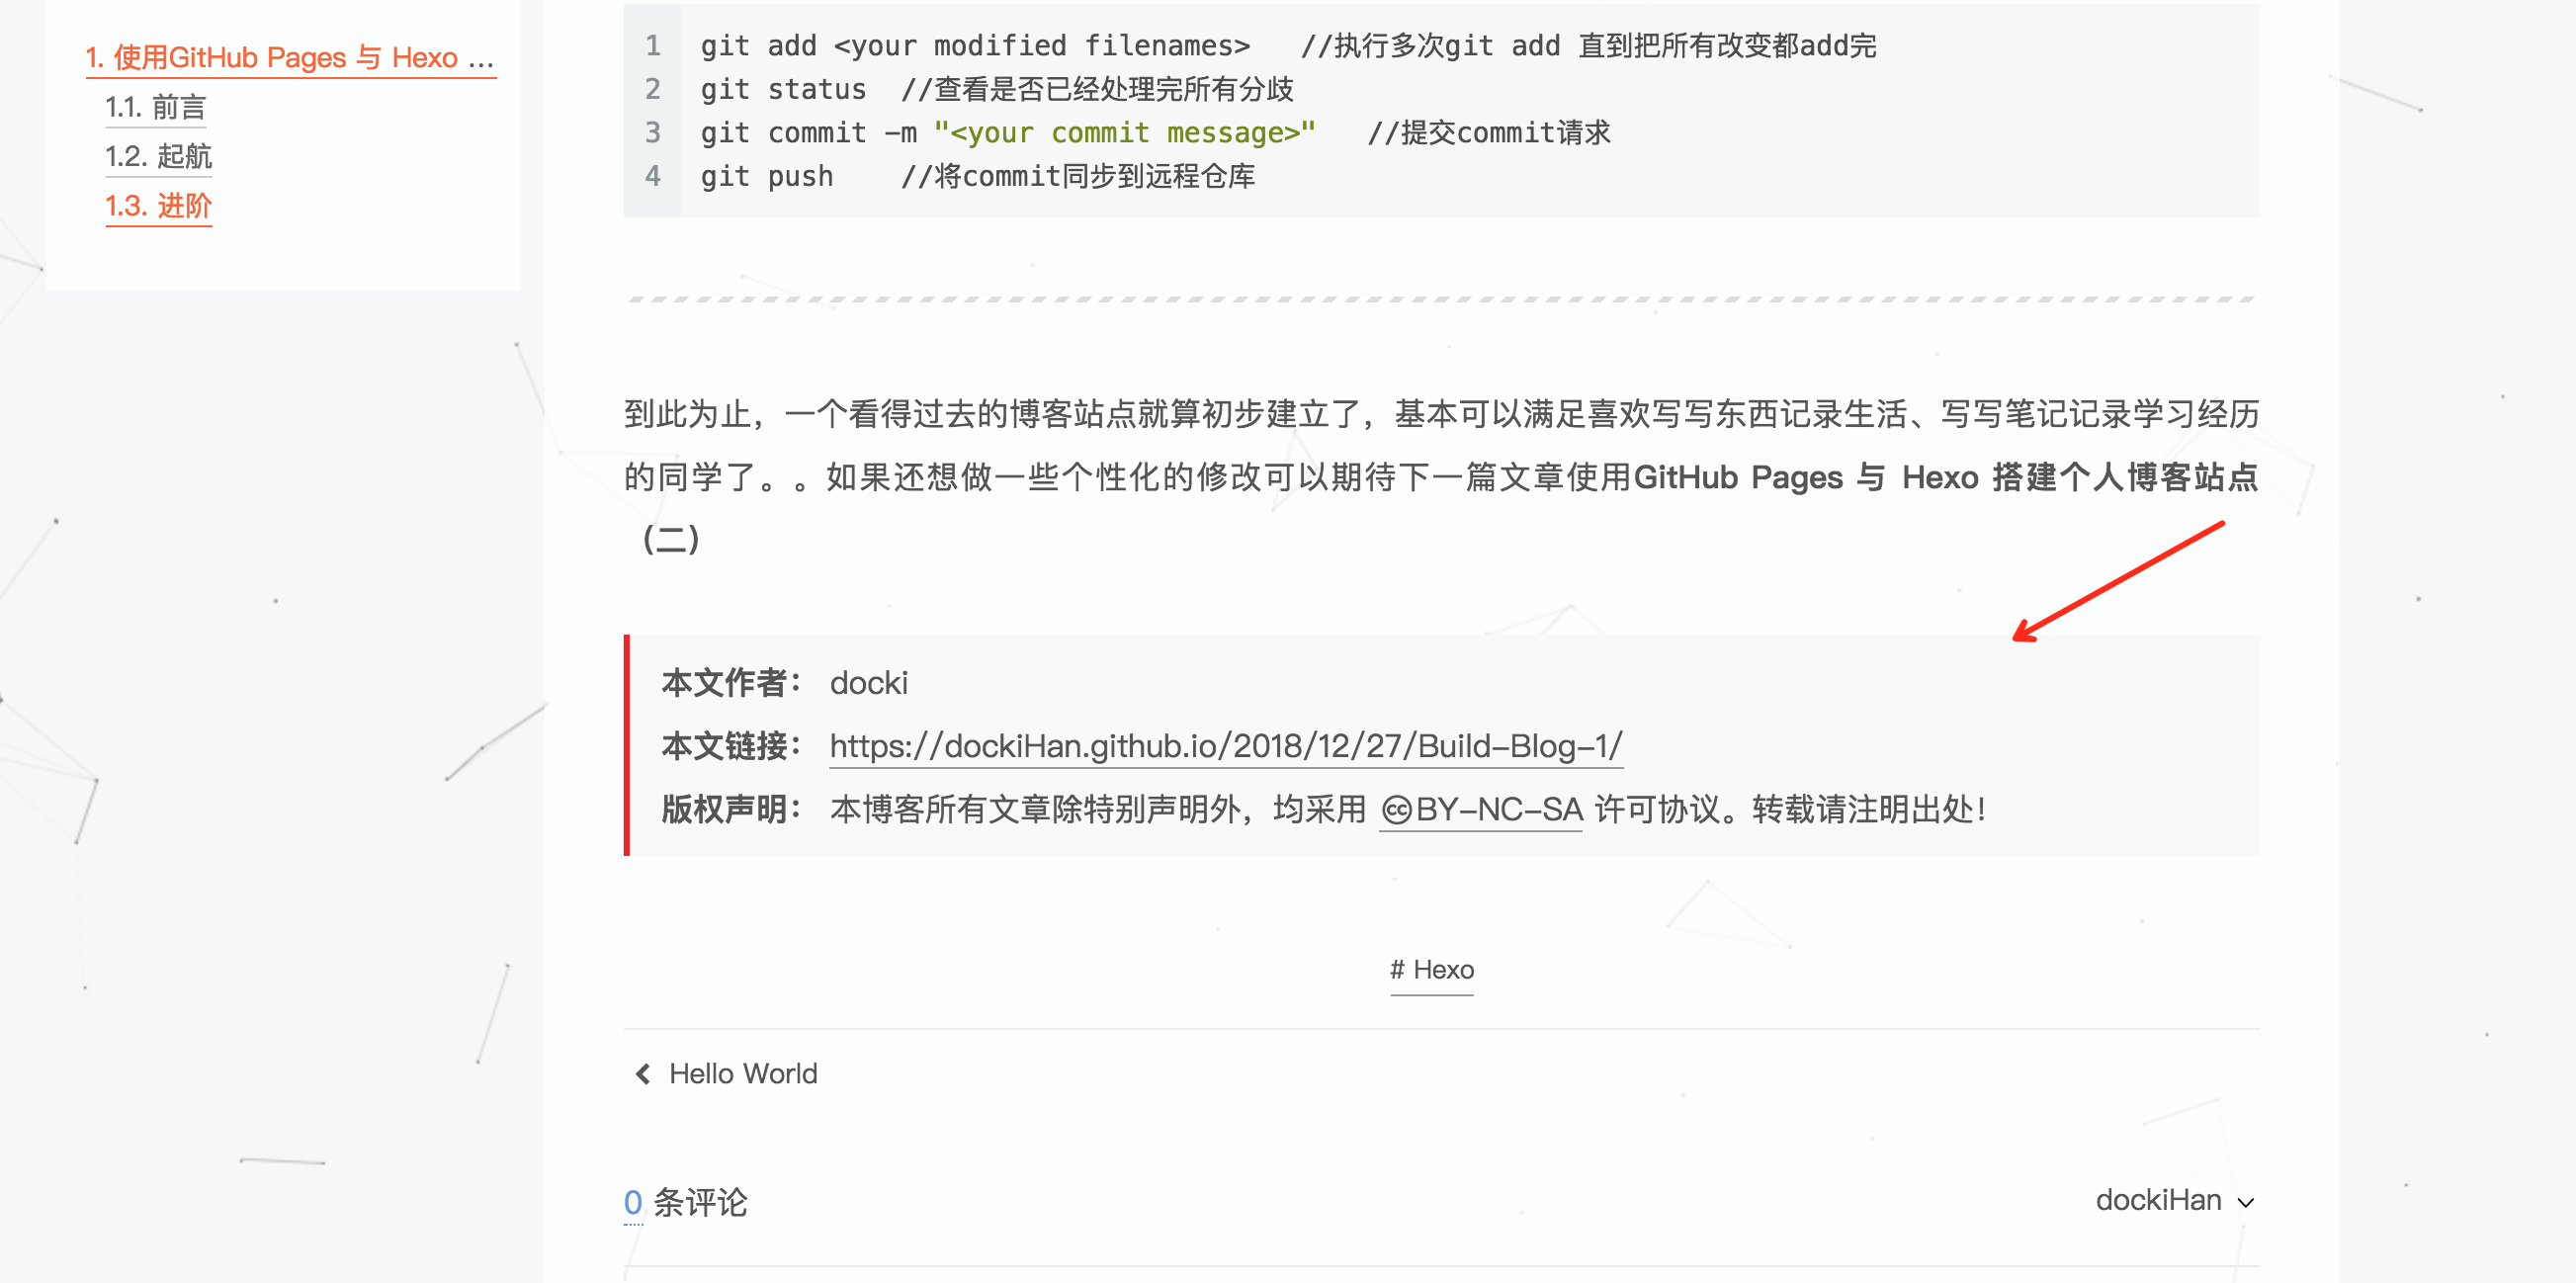
这里使用的 git 命令在上一篇文章中已经提到,不再赘述,还不会的小伙伴可学习google或百度 git 学习一下第八步,发布部署最新版本
1
2hexo clean
hexo d -g第九步,浏览器访问博客站点,在每篇文章最下方会有GitHub评论区,登录GitHub账号并初始化评论区
使用 LeanCloud 实现文章阅读数计数功能
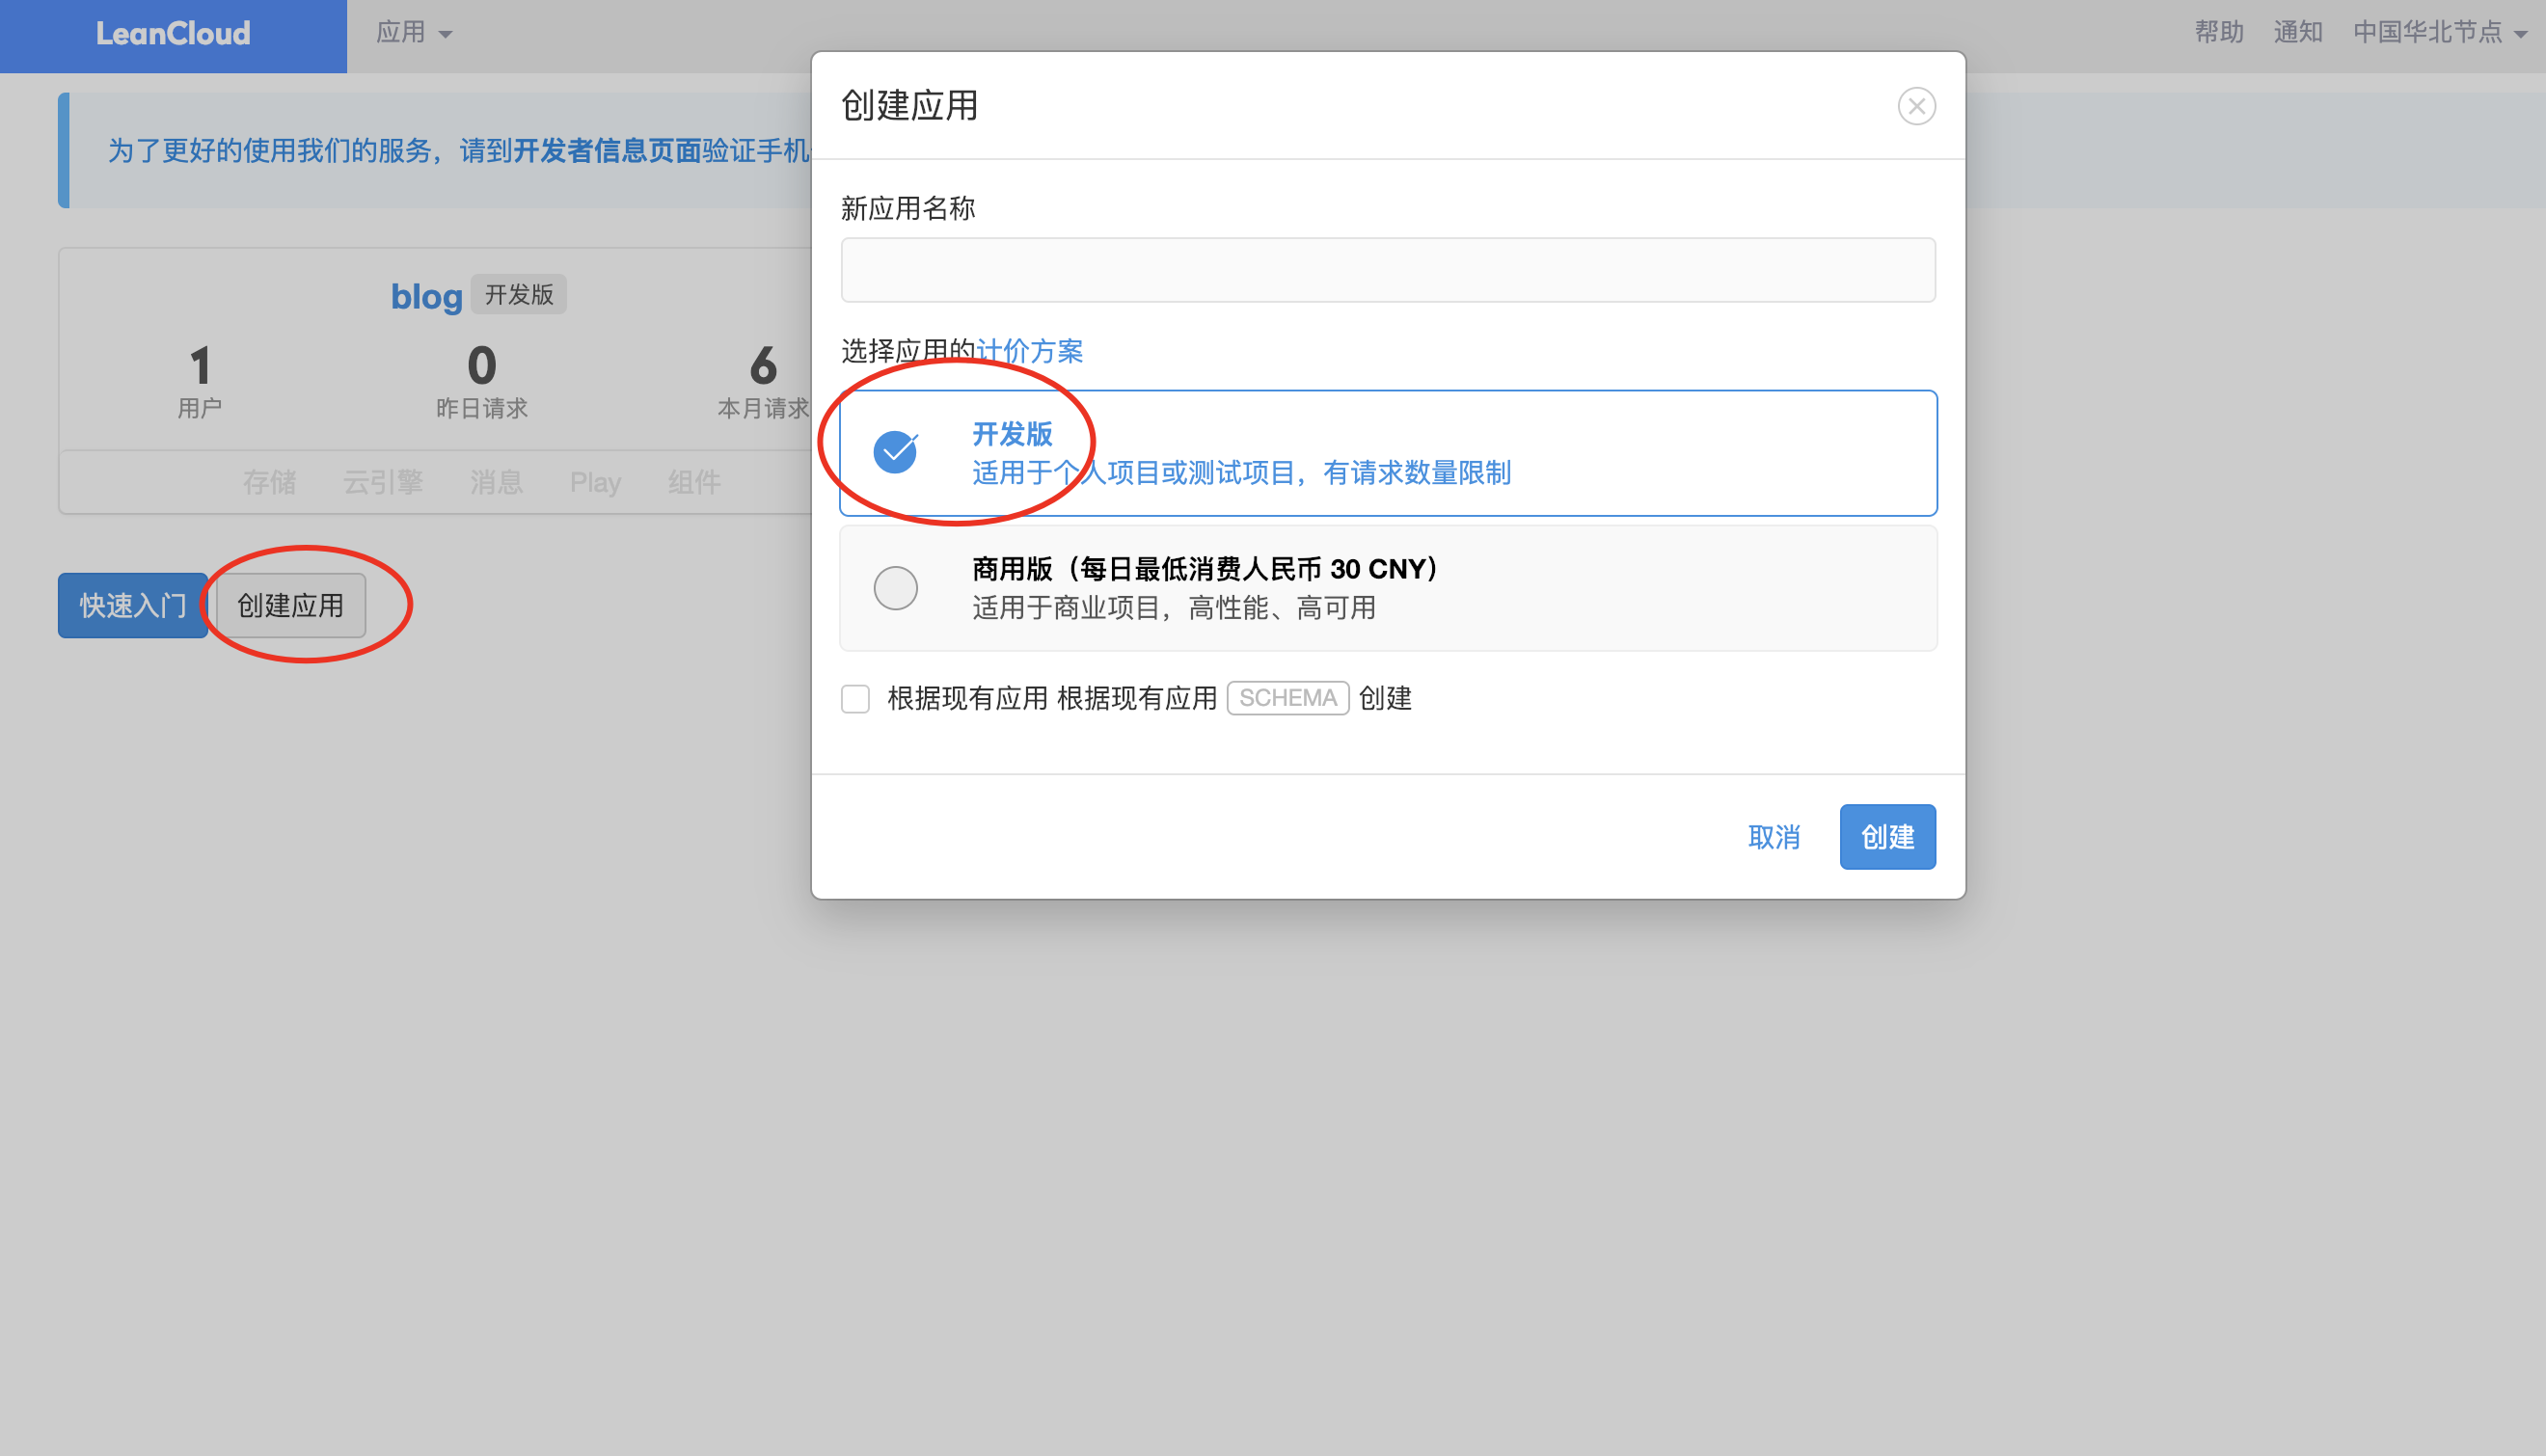
- 第一步,去 LeanCloud 注册账户并创建应用,如下图。注意勾选“开发版”否则就要付费了哟,应用名称可以随意取,图中的“blog” 就是我当时创建的应用。
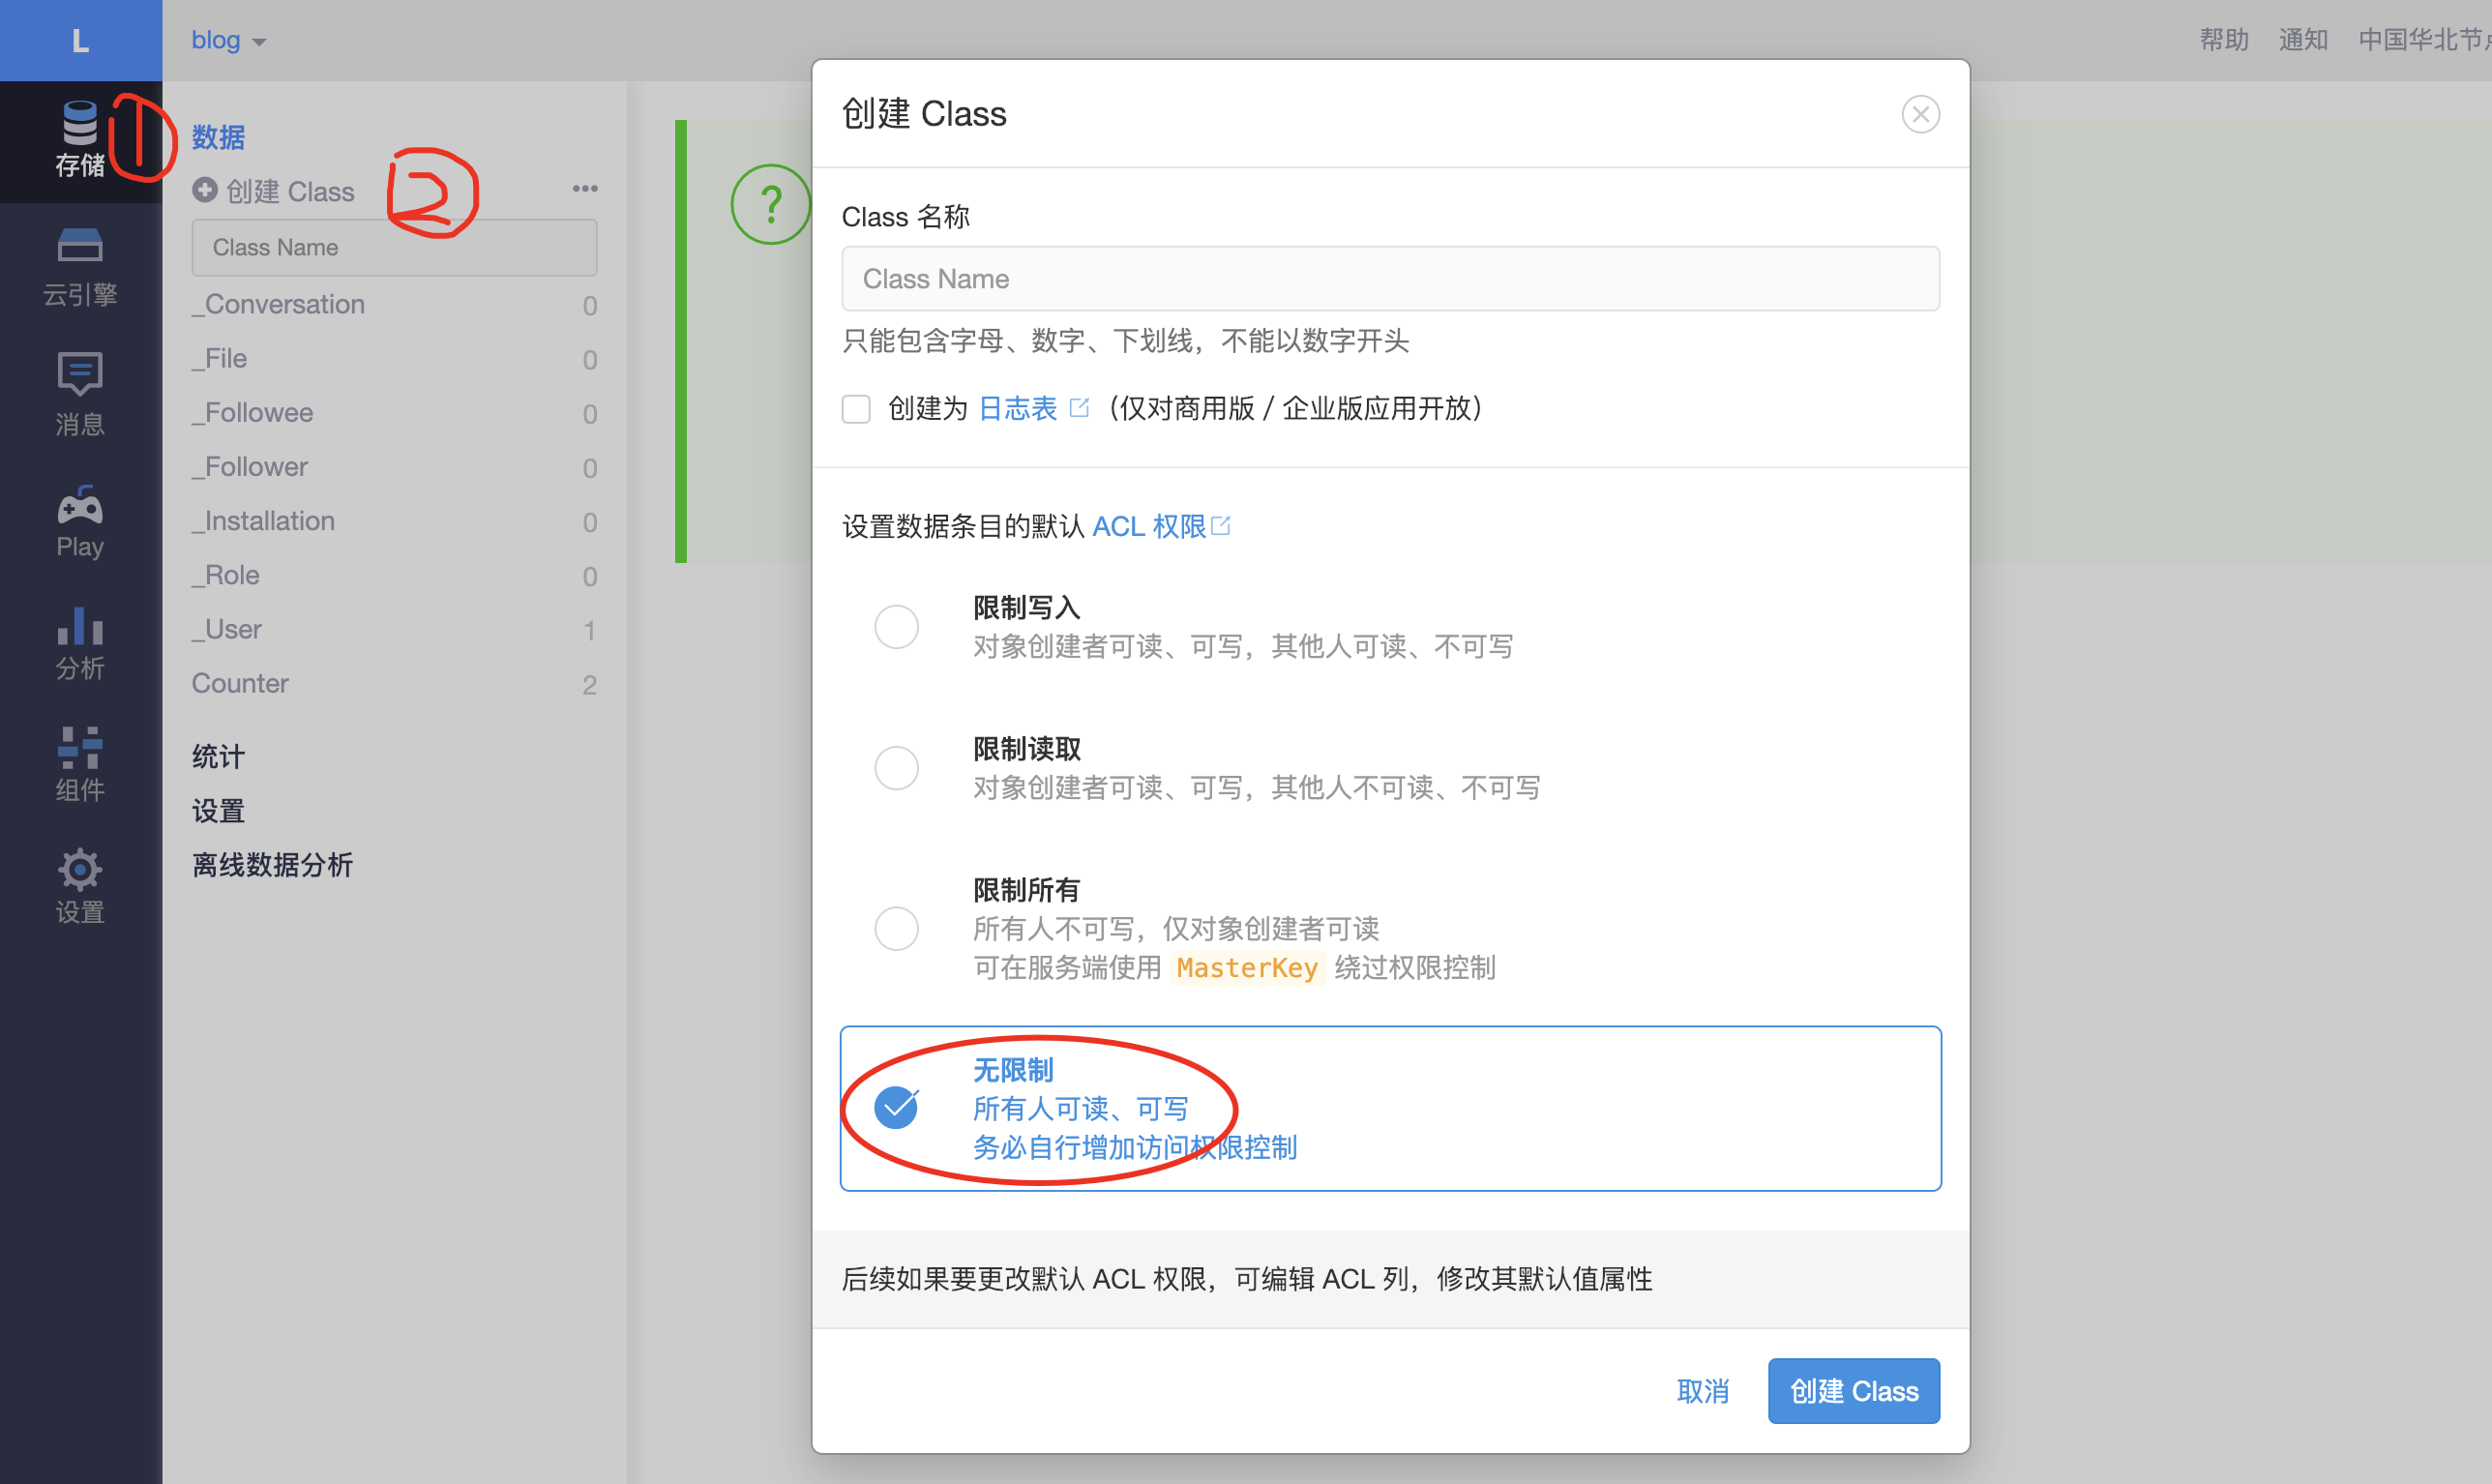
- 第二步,进入应用设置界面,新建一个新的 Class 用于计数。在设置界面先点击“存储”按钮,然后点击“创建 Class”按钮,就会出现下图所示的界面,Class 名称可以随意取(假设名为Count),注意权限设置时勾选最后一项“无限制”
- 第三步,配置 next 主题的 _config.yml 文件。首先在 LeanCloud 应用设置页面点击“设置“ –> “应用Key”获取该应用的 App ID 和 App Key,如下图:
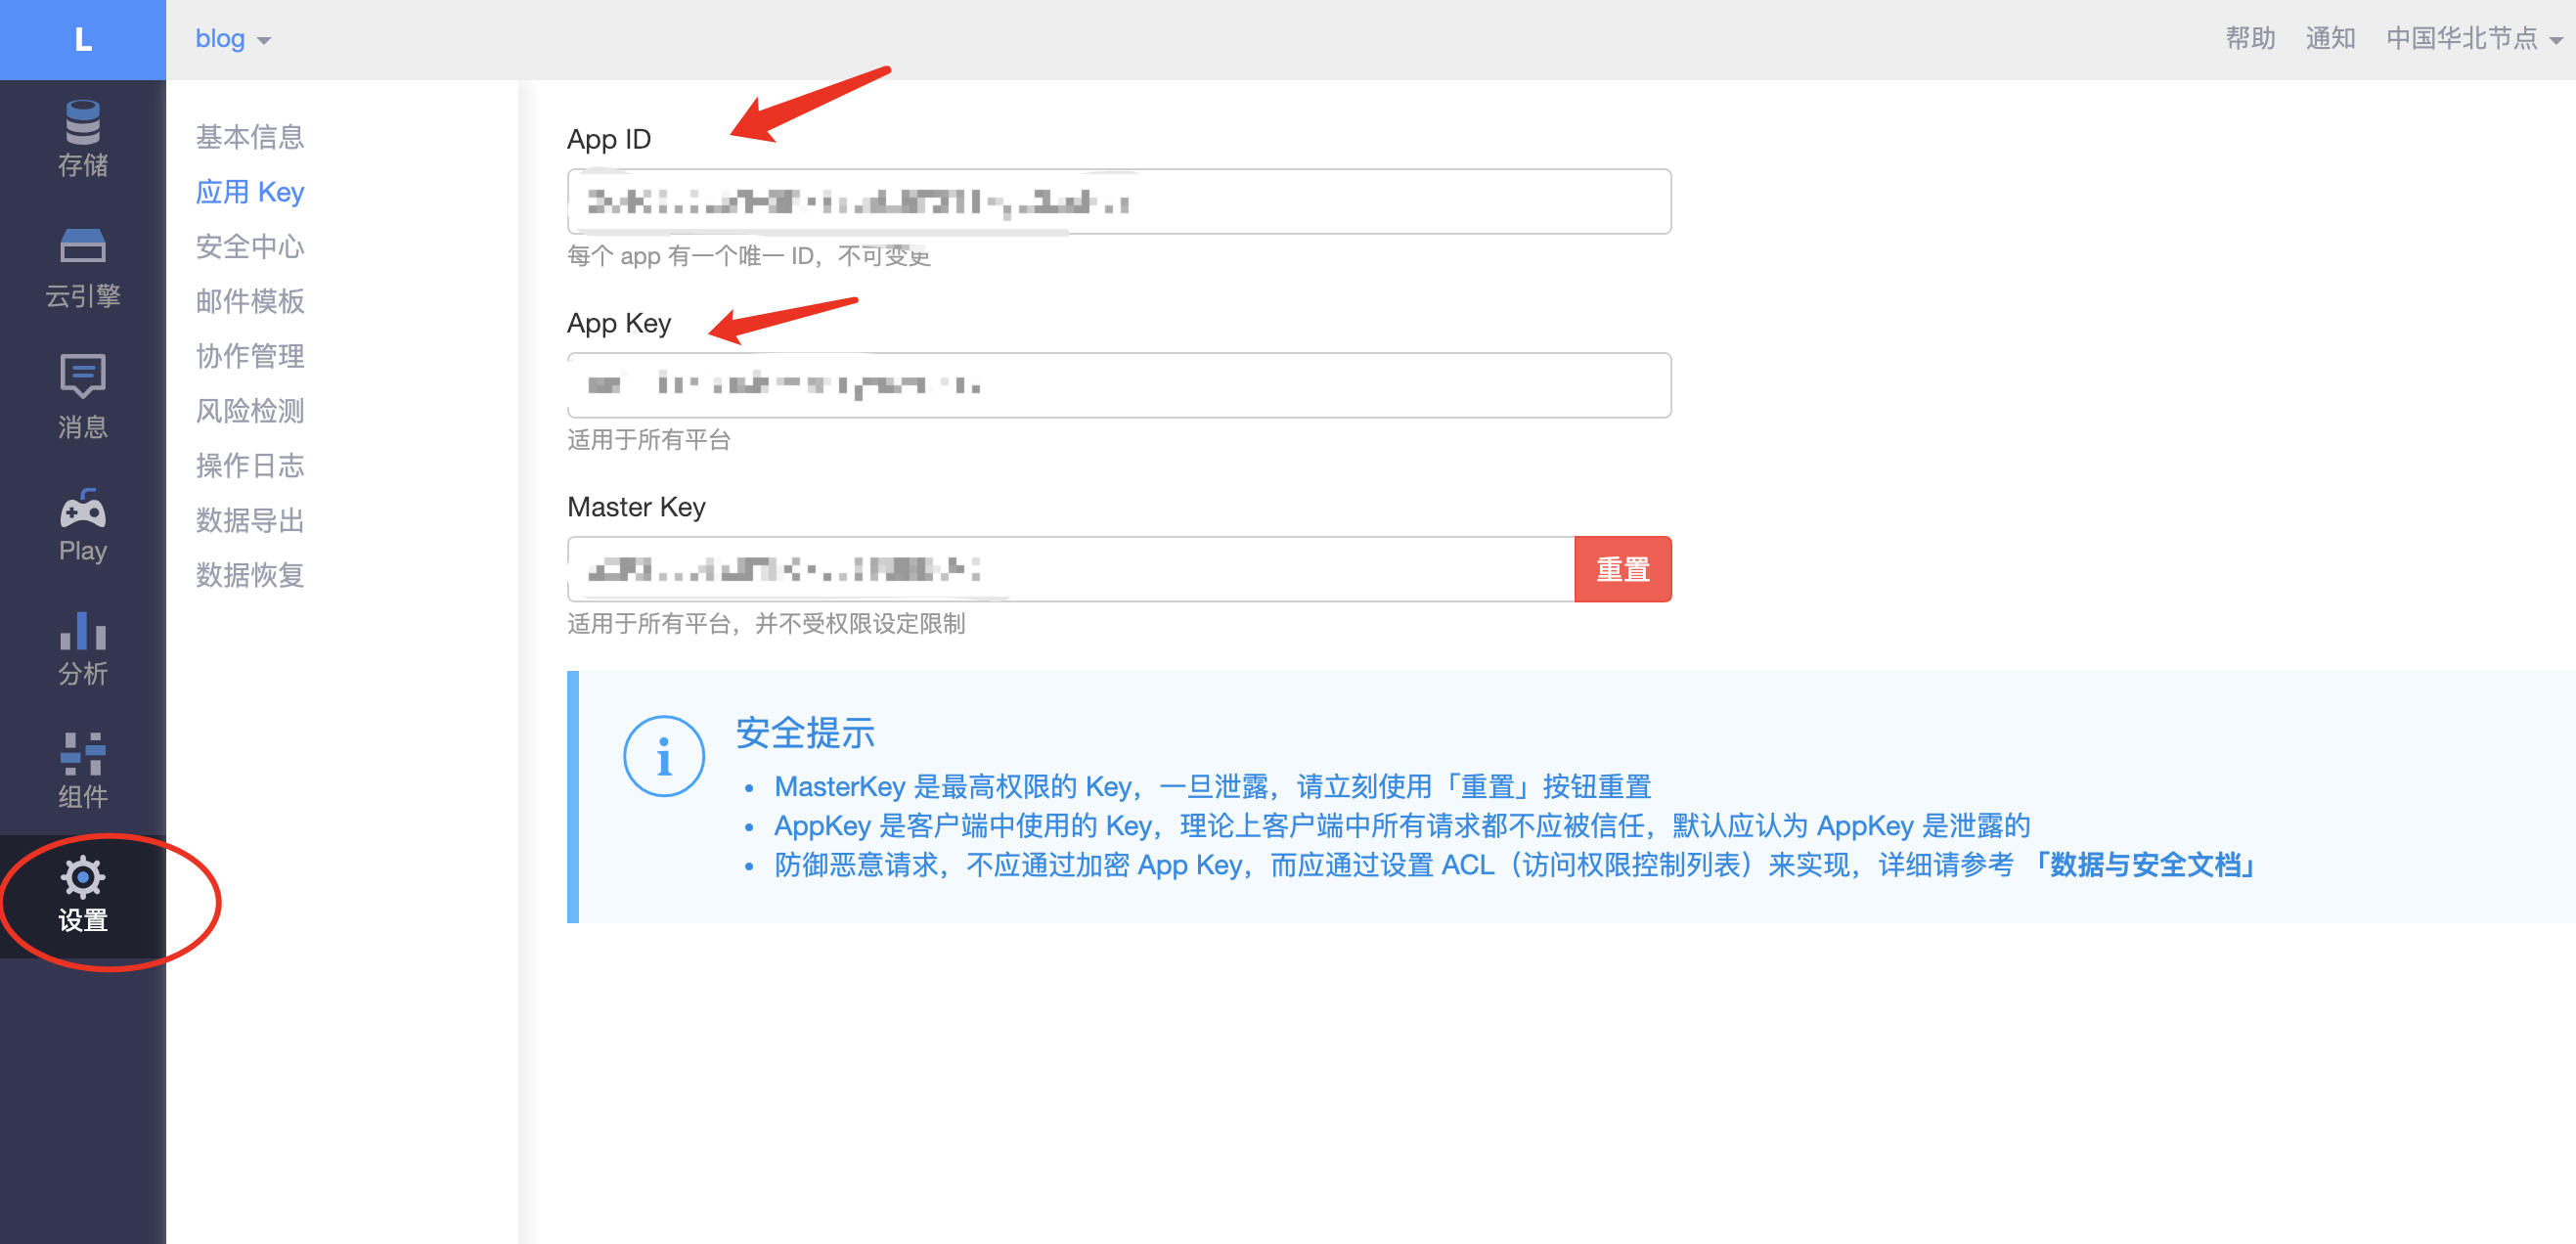
然后打开 next 目录下的 _config.yml 文件,找到 leancloud_visitors 属性做如下配置:1
2
3
4
5
6
7
8
9leancloud_visitors:
enable: true
app_id: 这里填上图中的App ID #<app_id>
app_key: 这里填上图中的App Key #<app_key>
# Dependencies: https://github.com/theme-next/hexo-leancloud-counter-security
# If you don't care about security in lc counter and just want to use it directly
# (without hexo-leancloud-counter-security plugin), set the `security` to `false`.
security: false
betterPerformance: false
- 第四步,使用 Git 命令更新远端的 build 分支,然后使用 hexo 命令发布最新版本。
设置背景动画
第一步,打开 next 主题配置文件中的 motion 属性
1
2
3
4# Use velocity to animate everything.
motion:
enable: true
async: false第二步,打开 canvas_nest 动画效果
1
2
3
4
5
6
7
8
9# Canvas-nest
# Dependencies: https://github.com/theme-next/theme-next-canvas-nest
canvas_nest:
enable: true
onmobile: true # display on mobile or not
color: '0,0,0' # RGB values, use ',' to separate
opacity: 0.65 # the opacity of line: 0~1
zIndex: -1 # z-index property of the background
count: 99 # the number of lines第三步,安装依赖,https://github.com/theme-next/theme-next-canvas-nest
修改页面透明度
由于 next 主题默认的背景是不透明的,如果我们设置的有 canvas_nest 和 canvas_three 等3D动画效果,则会被文章界面遮住,可以通过 CSS 样式来修改站点的页面透明度。
文章部分
文件位置 ~Hexo根目录/themes/next/source/css/_schemes/Gemini/index.styl
(“ - ” 表示删除该行,或者注释掉该行, “ + ” 表示添加该行代码,0.7 表示透明度)1
2
3
4
5
6
7
8// Post & Comments blocks.
.post-block {
padding: $content-desktop-padding;
- background: white;
+ background: rgba(255,255,255,0.7);
box-shadow: $box-shadow-inner;
border-radius: $border-radius-inner;
}阅读全文按钮
文件位置 ~Hexo根目录/themes/next/source/css/_variables/Pisces.styl1
2
3
4
5
6
7
8// Button
$btn-default-radius = 2px
- $btn-default-bg = white
+ $btn-default-bg = rgba(255,255,255,0.5)
$btn-default-color = $text-color
$btn-default-border-color = $text-color
$btn-default-hover-color = white
$btn-default-hover-bg = $black-deep分页部分
文件位置 ~Hexo根目录/themes/next/source/css/_schemes/Gemini/index.styl1
2
3
4
5
6
7
8
9
10
11
12
13// Pagination.
.pagination {
.prev, .next, .page-number {
margin-bottom: initial;
top: initial;
}
margin: sboffset 0 0;
- background: white;
+ background: rgba(255,255,255,0.7);
box-shadow: $box-shadow;
border-radius: $border-radius;
padding: 10px 0 10px;
}评论区部分
文件位置 ~Hexo根目录/themes/next/source/css/_schemes/Gemini/index.styl1
2
3
4
5
6
7
8
9
10// Comments blocks.
.comments {
padding: $content-desktop-padding;
margin: initial;
margin-top: sboffset;
- background: white;
+ background: rgba(255,255,255,0.7);
box-shadow: $box-shadow;
border-radius: $border-radius;
}侧栏菜单界面
文件位置 ~Hexo根目录/themes/next/source/css/_schemes/Pisces/_layout.styl1
2
3
4
5
6
7
8
9
10
11
12
13
14
15
16
17
18
19
20
21
22
23
24
25.header-inner {
position: absolute;
top: 0;
overflow: hidden;
padding: 0;
width: $sidebar-desktop;
- background: white;
+ background: rgba(255,255,255,0.7);
box-shadow: $box-shadow-inner;
border-radius: $border-radius-inner;
+desktop-large() {
.container & { width: $sidebar-desktop; }
}
+tablet() {
position: relative;
width: auto;
border-radius: initial;
}
+mobile() {
position: relative;
width: auto;
border-radius: initial;
}
}个人资料界面
文件位置 ~Hexo根目录/themes/next/source/css/_schemes/Pisces/_sidebar.styl1
2
3
4
5
6
7
8
9
10
11
12
13
14
15.sidebar-inner {
//padding: 20px 10px 0;
box-sizing: border-box;
width: $sidebar-desktop;
color: $text-color;
- background: white;
+ background: rgba(255,255,255,0.7);
box-shadow: $box-shadow;
border-radius: $border-radius;
if (hexo-config('motion.enable') and hexo-config('motion.transition.sidebar')) { opacity: 0; }
&.affix {
position: fixed;
top: $sidebar-offset;
}
特别感谢 https://liujunzhou.top/2018/8/16/page-background/ 前辈的总结
开启 fancybox 实现文章图片的放大功能
第一步,进入 next 主题的配置文件,开启 fancybox 配置
1
2
3
4
5# Fancybox. There is support for old version 2 and new version 3.
# Please, choose only any one variant, do not need to install both.
# For install 2.x: https://github.com/theme-next/theme-next-fancybox
# For install 3.x: https://github.com/theme-next/theme-next-fancybox3
fancybox: true第二步,在配置文件中配置 jquery 和 fancybox 依赖的 js 和 css
1
2
3
4
5
6
7
8
9
10
11
12
13
14
15
16
17
18
19
20
21
22
23
24
25# Script Vendors.
# Set a CDN address for the vendor you want to customize.
# For example
# jquery: https://ajax.googleapis.com/ajax/libs/jquery/2.2.0/jquery.min.js
# Be aware that you should use the same version as internal ones to avoid potential problems.
# Please use the https protocol of CDN files when you enable https on your site.
vendors:
# Internal path prefix. Please do not edit it.
_internal: lib
# Internal version: 2.1.3
# Example:
# jquery: //cdn.jsdelivr.net/npm/jquery@2.1.3/dist/jquery.min.js
# jquery: //cdnjs.cloudflare.com/ajax/libs/jquery/2.1.3/jquery.min.js
jquery: //cdn.jsdelivr.net/npm/jquery@2.1.3/dist/jquery.min.js
# Internal version: 2.1.5
# See: http://fancyapps.com/fancybox
# Example:
# fancybox: //cdn.jsdelivr.net/npm/fancybox@3.0.0/dist/js/jquery.fancybox.pack.js
# fancybox_css: //cdn.jsdelivr.net/npm/fancybox@3.0.0/dist/css/jquery.fancybox.min.css
# fancybox: //cdnjs.cloudflare.com/ajax/libs/fancybox/3.2.5/jquery.fancybox.min.js
# fancybox_css: //cdnjs.cloudflare.com/ajax/libs/fancybox/3.2.5/jquery.fancybox.min.css
fancybox: //cdn.jsdelivr.net/npm/fancybox@3.0.0/dist/js/jquery.fancybox.pack.js
fancybox_css: //cdn.jsdelivr.net/npm/fancybox@3.0.0/dist/css/jquery.fancybox.min.css第三步,安装 fancybox 依赖,根据配置文件你选择的 fancybox 版本去对应的 github 安装依赖。
For install 2.x: https://github.com/theme-next/theme-next-fancybox
For install 3.x: https://github.com/theme-next/theme-next-fancybox3
个人建议使用3.x,我在搭建站点时就是选择的3.x版本- 第四步,使用 Git 命令更新 build 分支,然后使用 hexo 命令发布最新版本
本人在搭建站点时所做的个性化配置就是这么多啦,个人认为基本满足了美观+实用的需求。最终的效果可见:https://dockihan.github.io/ 有任何问题欢迎来评论区讨论哟~ 预祝大家成功搭建起自己的博客站点!~