使用GitHub Pages 与 Hexo 搭建个人博客站点(一)

使用GitHub Pages 与 Hexo 搭建个人博客站点(一)


前言

谨以此文记录本人的博客建站历程,期间参考了众多前辈的建站经验,在后续正文中会做相关的引用说明。

作为一枚拖延症与懒惰症的晚期患者,最近突发奇想,想要写点东西来记录自己的学习点滴,于是乎开始了个人博客的踩坑之路……

本教程所涉及的各种工具及相应的版本说明

Requirements:

操作系统: MacOS

Git: git version 2.15.2 (Apple Git-101.1)

NodeJs: 10.4.1

Npm: 6.5.0

Hexo: 3.8.0

Next: v6.6.0 (直接git pull最新版)


起航

  • 首先去GitHub新建一个代码仓库,名称必须是userName(gitHub用户名).github.io

图-1

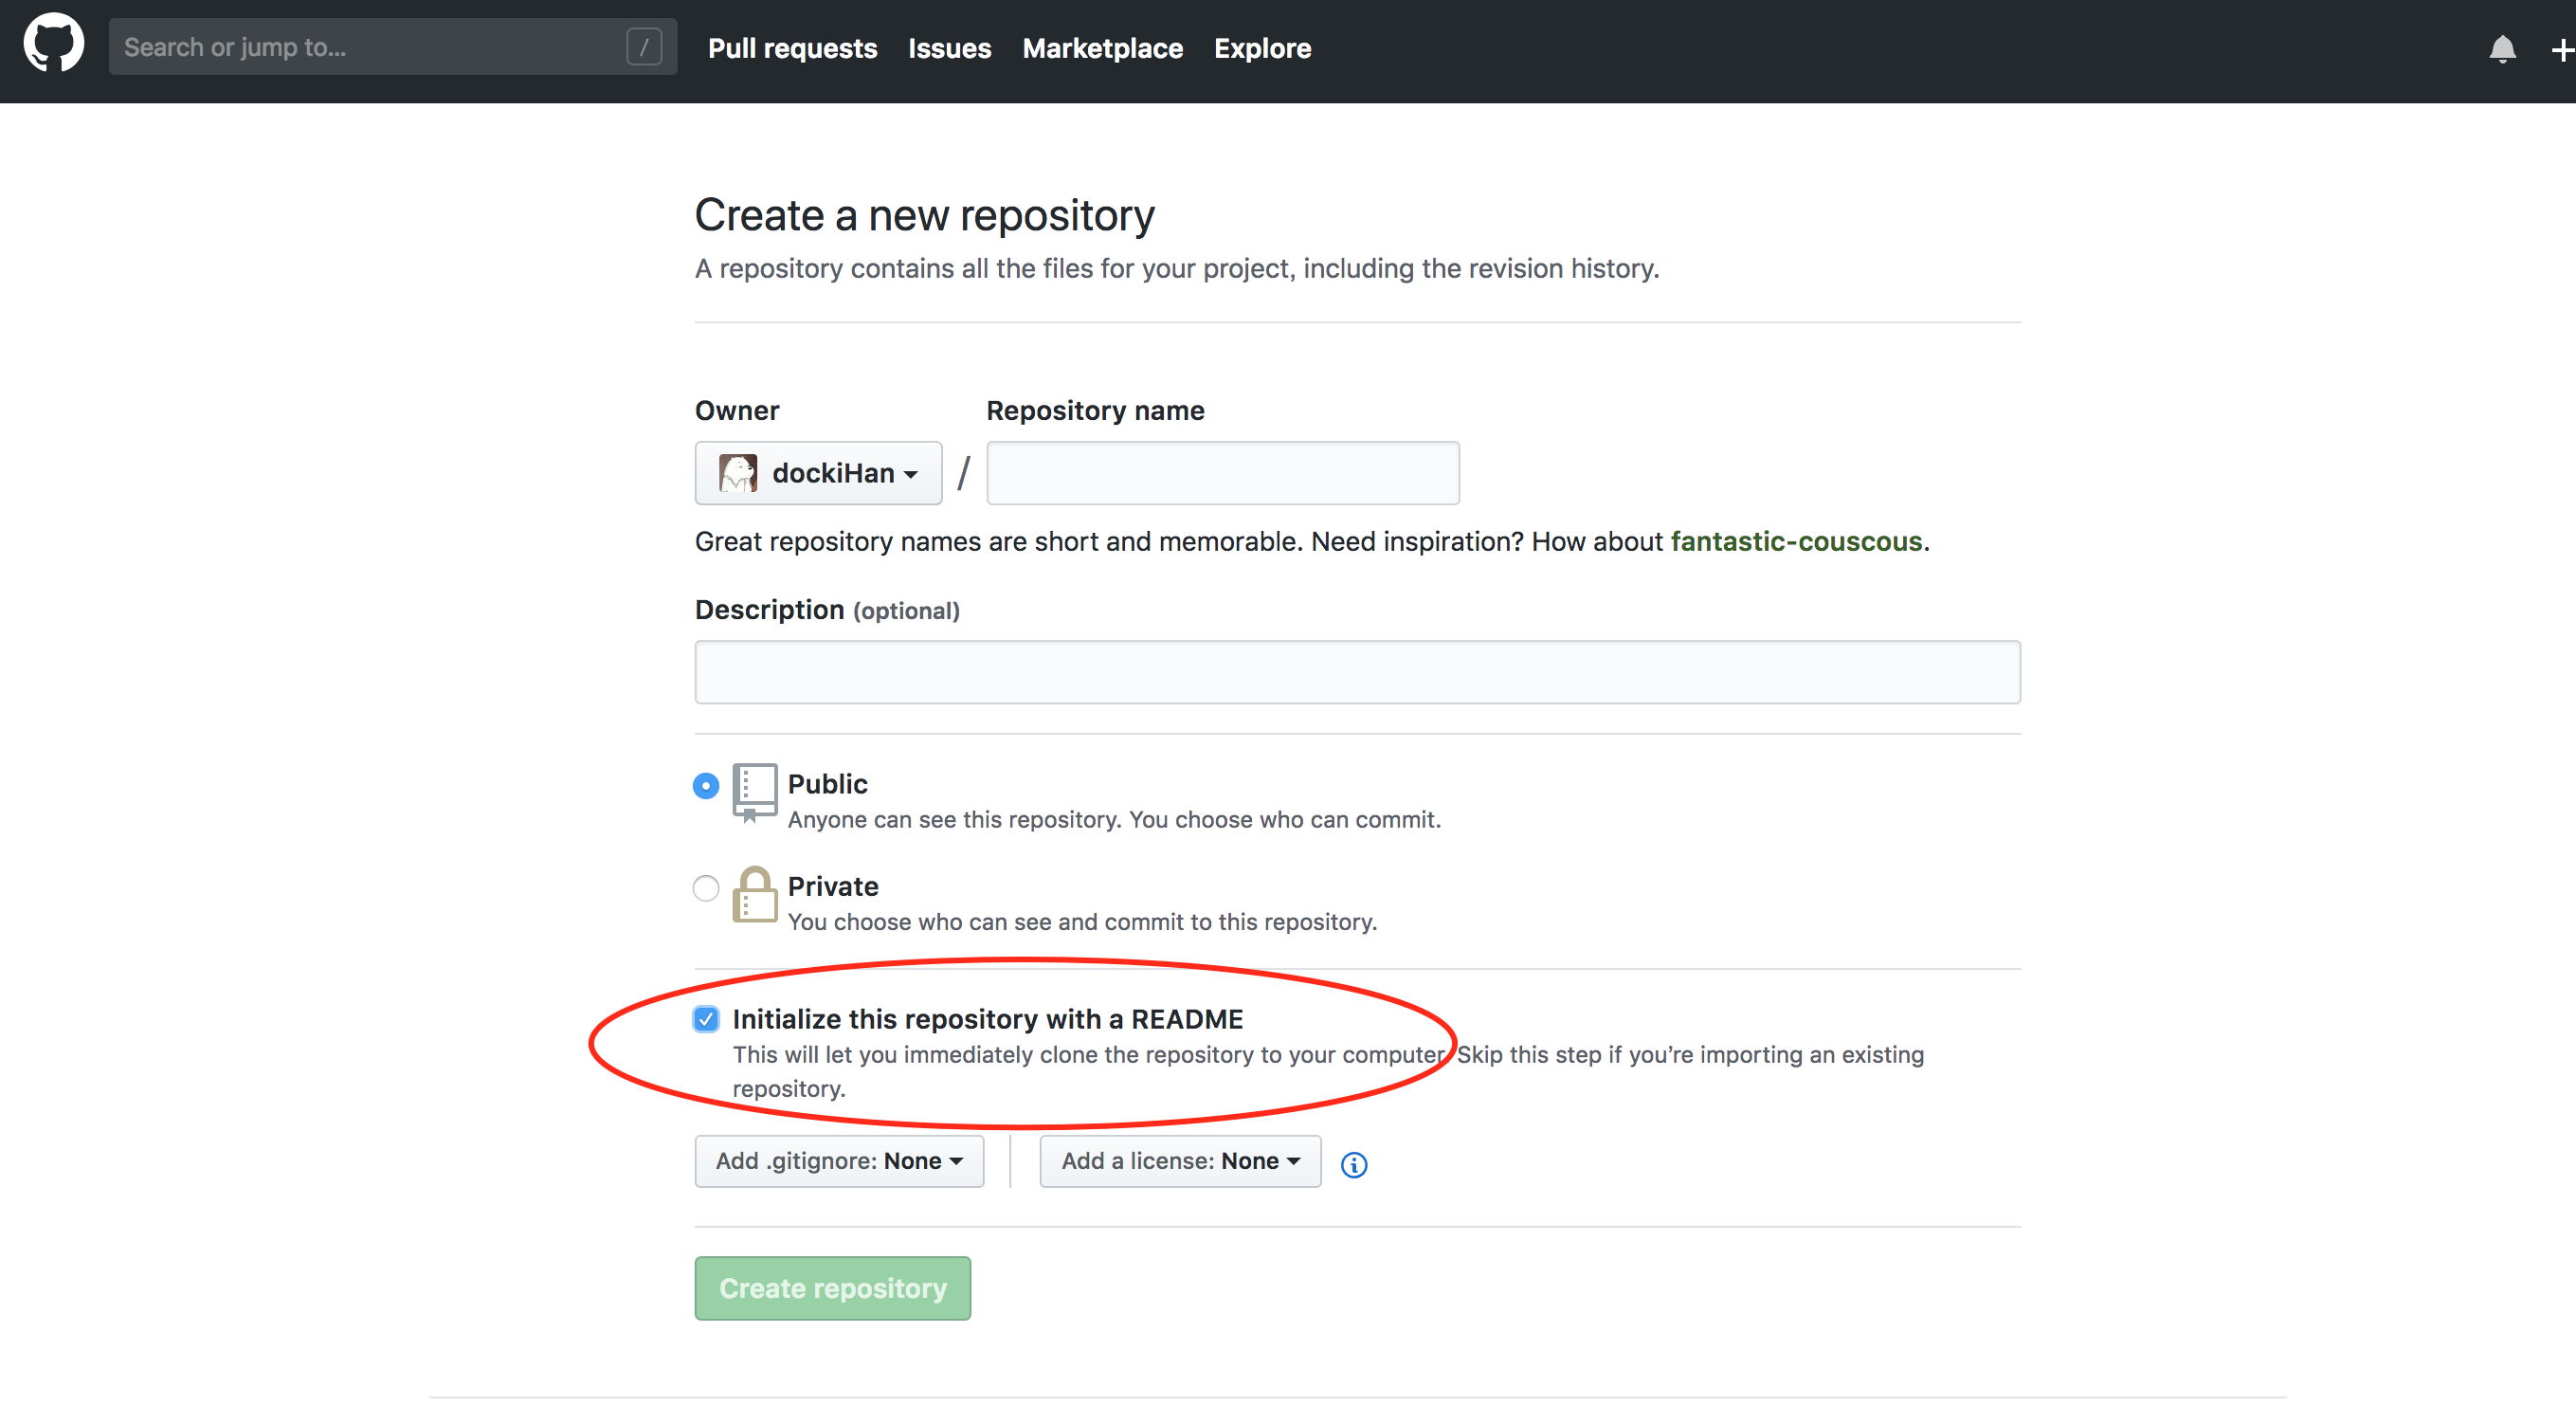
注意勾选 Initialize this repository with a README

  • 进入刚刚新建的代码库,新建一个远程分支(假设新分支名称为build)用于存储建站所需的内容。
    (由于GitHub Pages只能自动识别master分支,因此代码库的master分支只能用来存放博客部署的相关内容而不能存放其他内容,如果master分支放了额外内容则GitHub Pages会在生成页面时报错,导致个人主页404。我在这里被坑了好多次才顺利通过)
  • 配置 GitHub SSL
    • 执行 ssh-keygen -t rsa -C "<密钥值>" (<>内表示可以自由填写的内容)
    • 连按三次回车键直至生成密钥
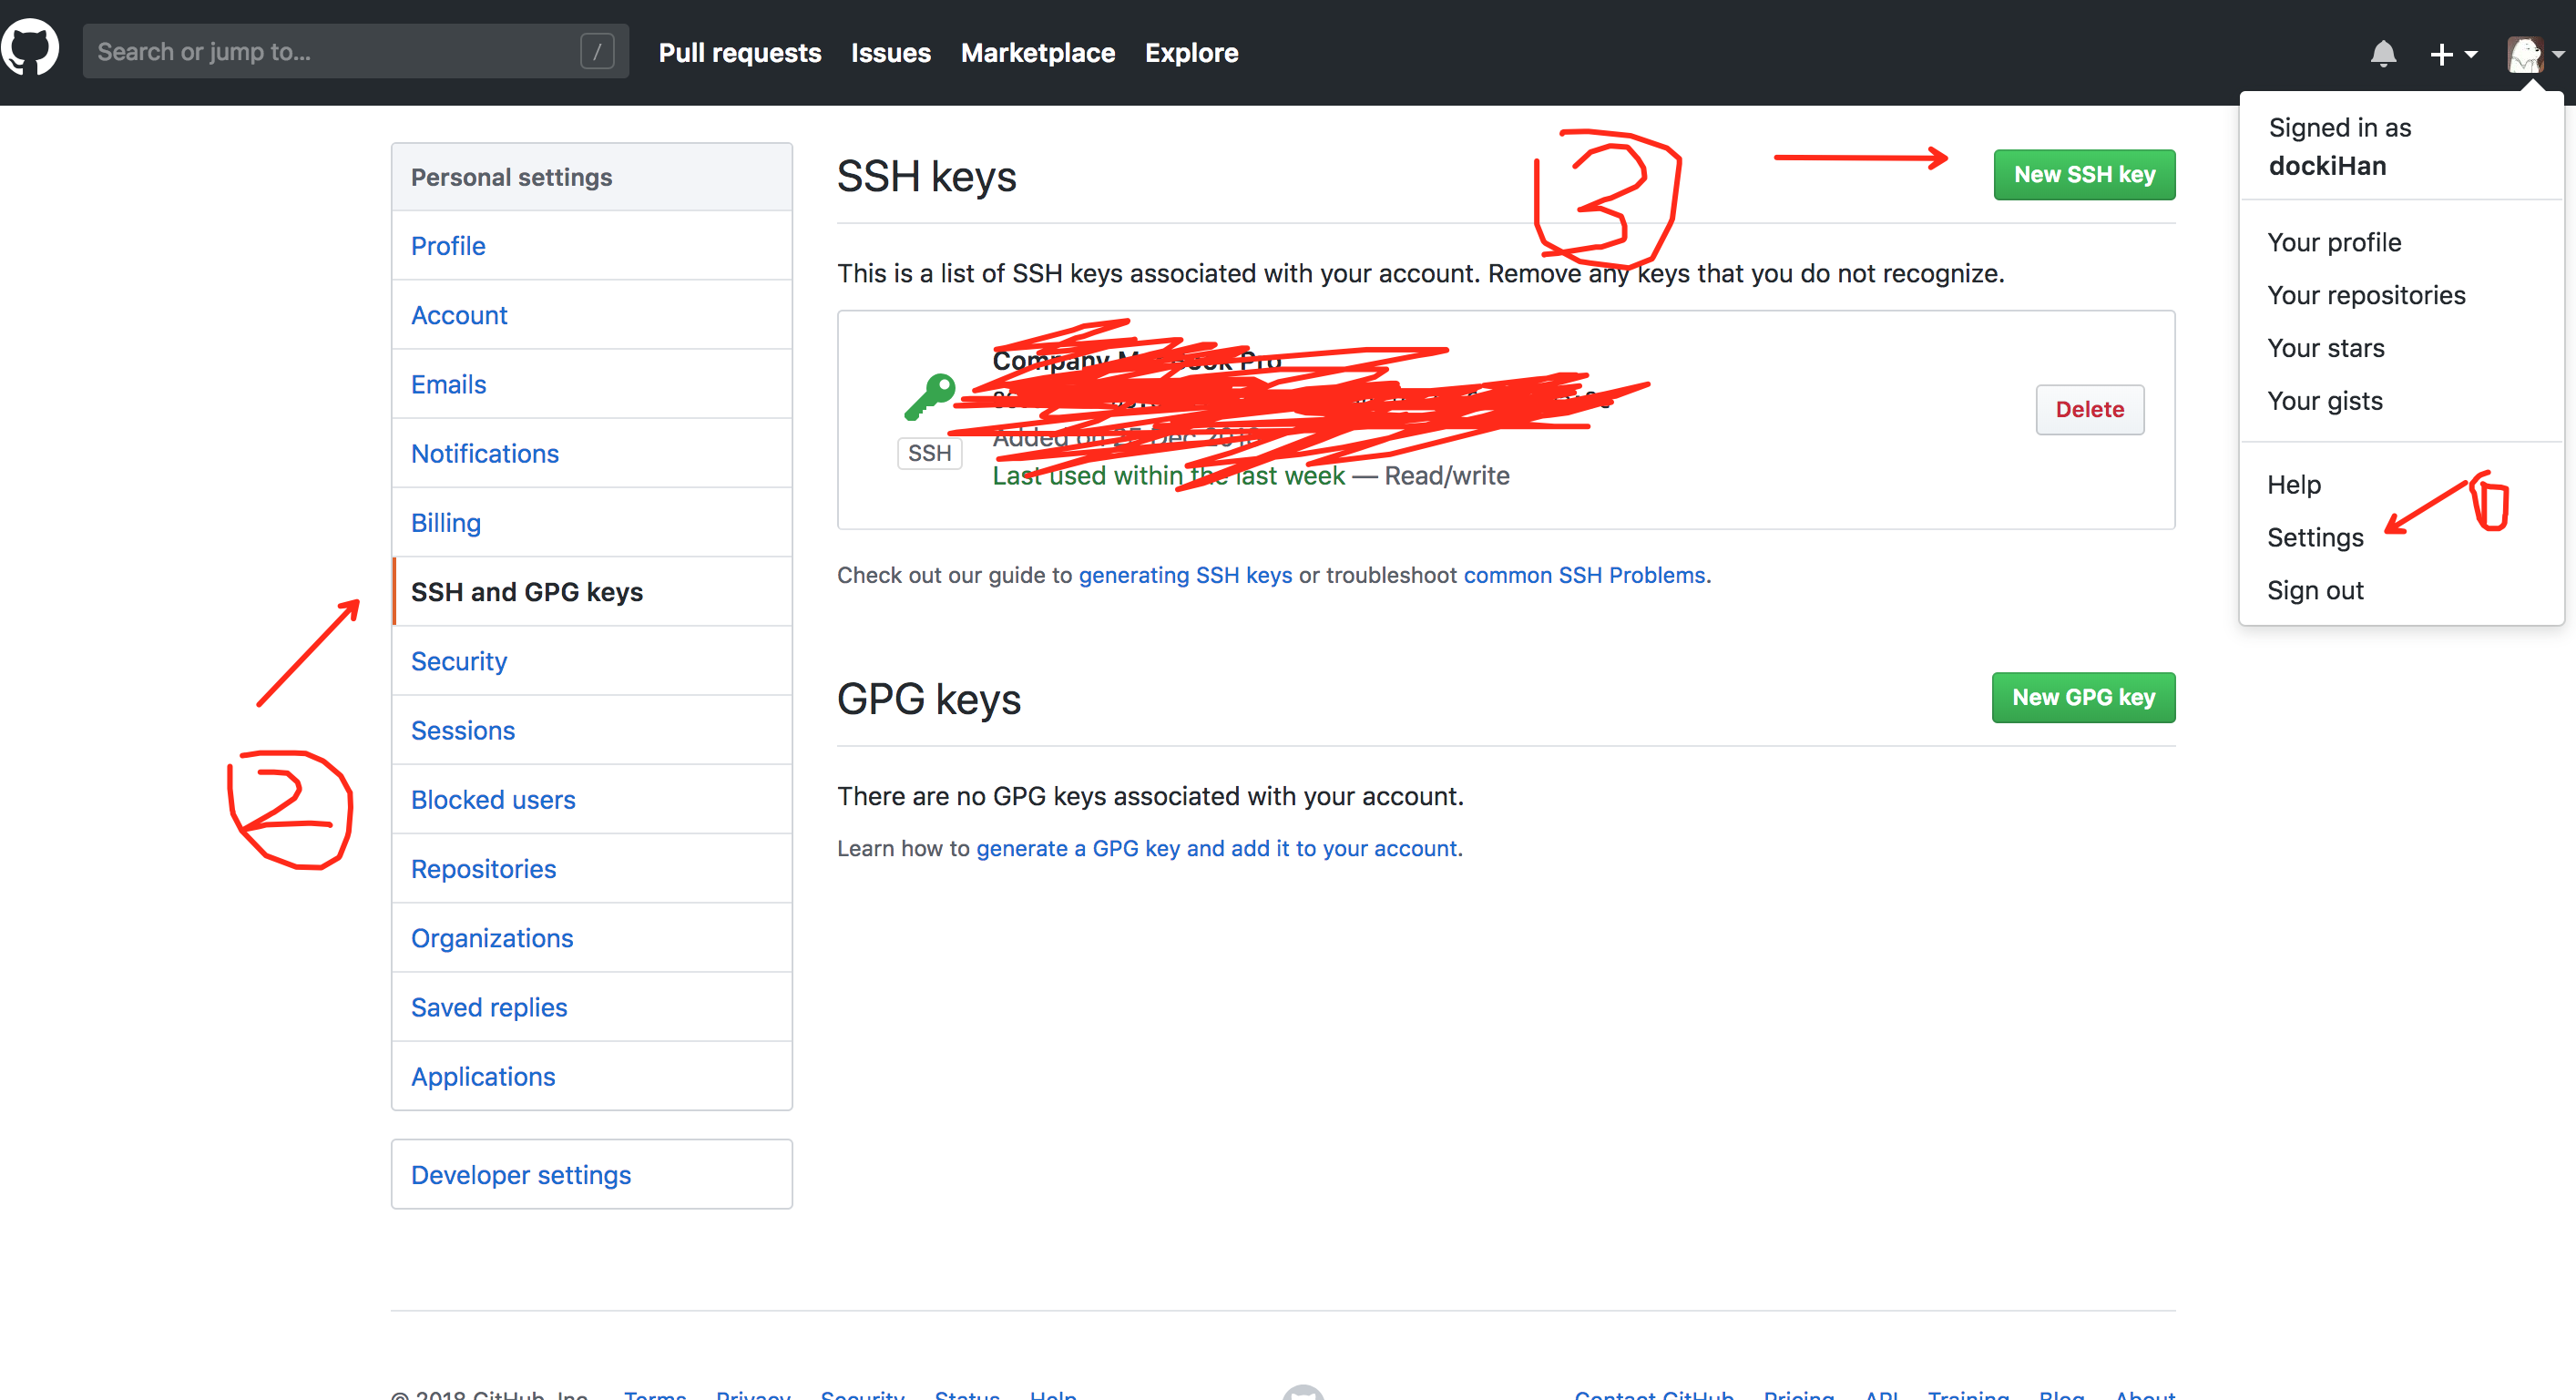
    • SSH KEY 生成之后会默认保存在 ~/.ssh 目录中,打开这个目录,cat 一下 id_rsa.pub 文件,复制全部内容,即复制密钥。
    • 打开 GitHub,依次点击 头像 –> Settings –> SSH and GPG keys –> Add SSH key,将复制的密钥粘贴到 key 输入框,最后点击 Add Key ,SSH KEY 配置成功,如下图所示:

图-5

  • 在本地执行 git pull 拉下代码库:
    • 拉取代码库
      git pull https://github.com/userName/userName.github.io.git
    • 新建本地分支build
      git checkout -b build
    • 为本地的build分支设置上游分支,设置为远程的build分支
      git branch --set-upstream-to origin build
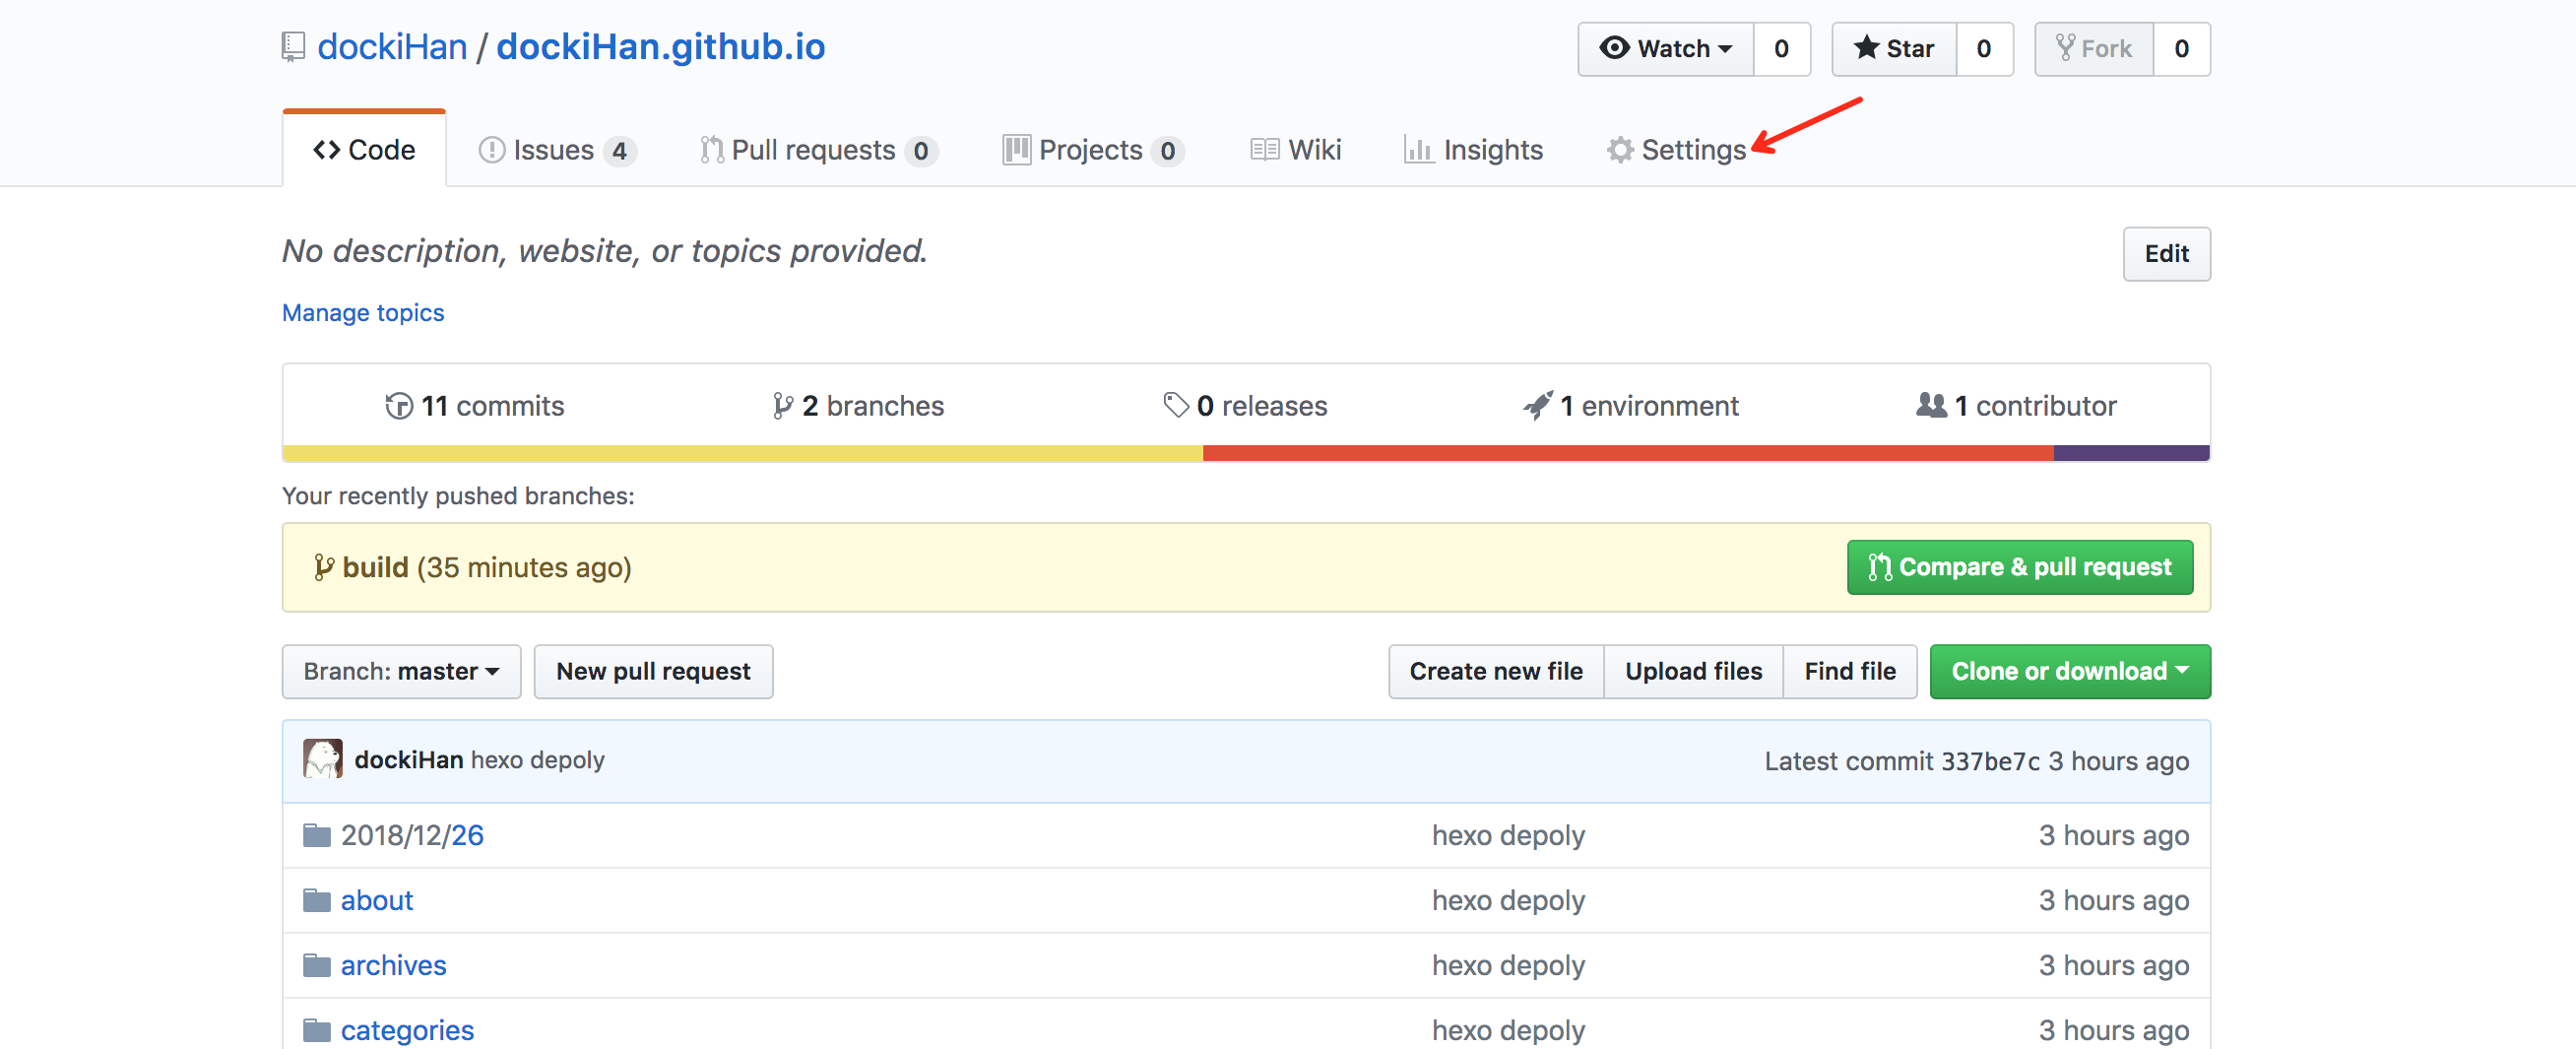
  • 在 GitHub 中进入代码库,在Settings中找到 GitHub Pages 将 Source 设置为 master 分支(如图)。然后在下面选择一个主题(可选操作,对后续影响不大)。

图-2

图-4

  • 注意时刻保持远程仓库与本地仓库的一致性,git 产生分歧后将会比较难处理。(后续操作中一定要保证 build 分支的一致性, master 分支在这里作为博客部署分支,可以不用在本地手动 git pull,后面介绍的 hexo-deployer-git 会去处理 master 分支)
    如果远程仓库有了改变,在本地的仓库执行 git pull 拉取最新的内容
    如果本地仓库有了改变, 依次执行 git add <your file name> git commit -m "<your commit message>"git push
    同时注意当前的本地分支,在本地 git 仓库会都有所标注(如图所示,当前操作的分支即是本地的build分支)

图-3

切换当前分支可使用命令git checkout <branch name>
其他有关Git的操作这里就不再赘述,可以自行 Google 或者百度

  • 安装 Hexo 以及相关依赖
    • 安装 Node JS 官方传送门
    • 安装 Hexo npm install -g hexo-cli 如果 npm 执行较慢可先更换一下镜像。 使用临时源(阿里源)npm --registry https://registry.npm.taobao.org install -g hexo-cli 其他 npm 镜像相关操作可参见https://www.jianshu.com/p/f311a3a155ff
    • 在 build 分支下初始化hexo hexo init hexo
    • 进入hexo目录,安装相关依赖
1
2
3
cd hexo
npm install
hexo generate
  • 启动 hexo 本地 server hexo server
  • 浏览器访问 lcalhost:4000 即可看到初始化的博客页面了(按 Ctrl + C 可停止 hexo 本地服务器)
  • 配置 hexo 配置文件
    进入 hexo 目录,打开 _config.yml 配置文件做如下配置
1
2
3
4
5
6
7
8
9
10
11
12
13
14
15
16
17
18
19
20
21
22
23
24
25
26
27
# Hexo Configuration
## Docs: https://hexo.io/docs/configuration.html
## Source: https://github.com/hexojs/hexo/
# Site
title: Docki's Home
subtitle: 非淡泊无以明志,非宁静无以致远
description: 走在求知的路上
keywords:
author: docki
language: zh-CN
timezone: Asia/Shanghai
# URL
## If your site is put in a subdirectory,
## set url as 'http://yoursite.com/child' and root as '/child/'
url: https://dockiHan.github.io
root: /
permalink: :year/:month/:day/:title/
permalink_defaults:
# Directory
source_dir: source
public_dir: public
tag_dir: tags
archive_dir: archives
category_dir: categories
code_dir: downloads/code
i18n_dir: :lang
skip_render:
1
2
3
4
5
6
7
# Deployment
## Docs: https://hexo.io/docs/deployment.html
deploy:
type: git
repository: https://github.com/yourName/yourName.github.io.git
branch: master
message: hexo depoly
  • 执行下面的命令,安装 hexo-deployer-git 插件,快速把代码托管到 GitHub 上
    npm install hexo-deployer-git
    (安装速度慢可更换npm镜像,–见前文)
  • 执行下面的代码命令,将 hexo 项目托管到 GitHub 上,Hexo 会通过上面配置文件中的 # Deployment 相关配置进行部署。
1
2
hexo clean  //清空当前缓存
hexo d -g //d 为deploy的缩写,g为generate的缩写,表示生成静态页面并部署

进阶

目前肯定会有很多小伙伴不满足于现状,想要自己的博客站点变得更酷一些、更炫一点,最简单的方法就是去找一些前端大神实现好的主题,然后在此基础上做一些个性化的定制,这里就以人气值最高的Next主题为例……

  • 下载 Next 主题
    官方传送门:GitHub
    这里推荐使用 git 方式安装,后续更新非常方便
  • 修改全局配置文件( hexo 目录下的 _config.yml )
    将 Extension 片段的 Theme 改为 next 如下
1
2
3
4
# Extensions
## Plugins: https://hexo.io/plugins/
## Themes: https://hexo.io/themes/
theme: next
  • 修改 Next 主题的配置文件( themes/next/ 目录下的 _config.yml )

  • 配置页脚部分

1
2
3
4
5
6
7
8
9
10
11
12
13
14
15
16
17
18
19
20
21
22
23
footer:
# Specify the date when the site was setup.
# If not defined, current year will be used.
since: 2018

# Icon between year and copyright info.
icon:
# Icon name in fontawesome, see: https://fontawesome.com/v4.7.0/icons
# `heart` is recommended with animation in red (#ff0000).
name: heart
# If you want to animate the icon, set it to true.
animated: false
# Change the color of icon, using Hex Code.
color: "#808080"

# If not defined, will be used `author` from Hexo main config.
copyright: docki
# -------------------------------------------------------------
powered:
# Hexo link (Powered by Hexo).
enable: false
# Version info of Hexo after Hexo link (vX.X.X).
version: true
  • 配置浏览器导航栏上面的网页图标。其中的/images路径为:next目录下的/source/images
1
2
3
4
5
favicon:
small: /images/font_logo.png
medium: /images/font_logo.png
apple_touch_icon: /images/font_logo.png
safari_pinned_tab: /images/logo.svg
  • 配置菜单栏
1
2
3
4
5
6
7
8
9
10
11
12
13
14
15
16
17
18
19
20
21
22
23
24
# ---------------------------------------------------------------
# Menu Settings
# ---------------------------------------------------------------

# When running the site in a subdirectory (e.g. domain.tld/blog), remove the leading slash from link value (/archives -> archives).
# Usage: `Key: /link/ || icon`
# Key is the name of menu item. If translate for this menu will find in languages - this translate will be loaded; if not - Key name will be used. Key is c#
# Value before `||` delimeter is the target link.
# Value after `||` delimeter is the name of FontAwesome icon. If icon (with or without delimeter) is not specified, question icon will be loaded.
# External url should start with http:// or https:// .
menu:
home: / || home
categories: /categories/ || th
tags: /tags/ || tags
archives: /archives/ || archive
about: /about/ || user
#schedule: /schedule/ || calendar
#sitemap: /sitemap.xml || sitemap
#commonweal: /404/ || heartbeat

# Enable/Disable menu icons / item badges.
menu_settings:
icons: true
badges: false

填写完配置文件后还需使用 hexo new page 新建菜单选项对应的页面,否则点击菜单按钮时会报 404 错误。。。

1
2
3
hexo new page 'categories'
hexo new page 'tags'
hexo new page 'about'

此时 source 目录下会新建有三个目录 categories, tags, about 如下图:

图-6

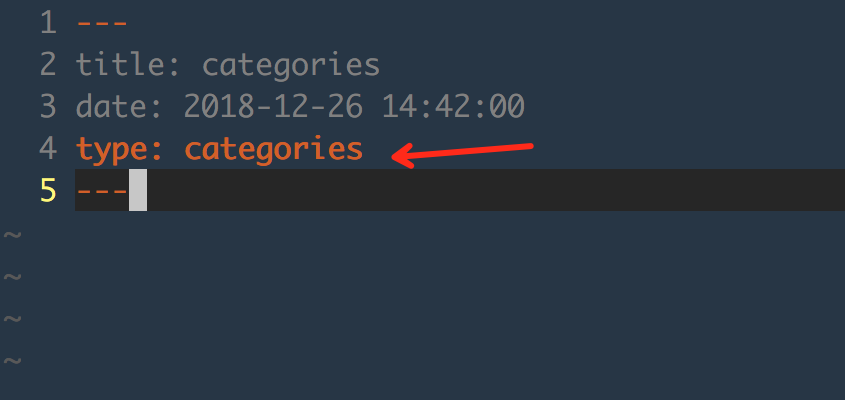
在每个目录下都会生成有一个 index.md 文件,之后我们需要给每个 index.md 文件添加一个 type 字段,然后填写对应的类型。如下图所示:

图-7

tags 和 about 对应的 index.md 与上图修改方式相同。

  • 选择Pisces样式
1
2
3
4
5
6
7
8
9
# ---------------------------------------------------------------
# Scheme Settings
# ---------------------------------------------------------------

# Schemes
#scheme: Muse
#scheme: Mist
scheme: Pisces
#scheme: Gemini
  • 配置左侧导航栏中的头像(此处/images路径同样是next目录下/source/images,自备图像并放到这个路径下)
1
2
3
4
5
6
7
8
9
10
11
12
# Sidebar Avatar
avatar:
# in theme directory(source/images): /images/avatar.gif
# in site directory(source/uploads): /uploads/avatar.gif
# You can also use other linking images.
url: /images/font_logo.png
# If true, the avatar would be dispalyed in circle.
rounded: true
# The value of opacity should be choose from 0 to 1 to set the opacity of the avatar.
opacity: 0.8
# If true, the avatar would be rotated with the cursor.
rotated: false
  • 安装搜索插件

在 hexo 目录下执行

1
npm install hexo-generator-searchdb

打开 hexo 目录下的全局配置文件 _config.yml 在最下方添加如下配置:

1
2
3
4
5
# Search Bar
path: search.xml
field: post
format: html
limit: 10000

打开 next 目录下的主题配置文件,找到 local_search 属性,开启本地搜索功能:

1
2
3
4
5
6
7
8
9
10
11
# Local search
# Dependencies: https://github.com/theme-next/hexo-generator-searchdb
local_search:
enable: true
# if auto, trigger search by changing input
# if manual, trigger search by pressing enter key or search button
trigger: auto
# show top n results per article, show all results by setting to -1
top_n_per_article: 1
# unescape html strings to the readable one
unescape: false
  • 发布文章

在 hexo 目录下执行 hexo new "Hello Hexo" 将会创建一篇名为 Hello Hexo 的文章,文章会存储在 hexo/source/_posts/ 目录下。进入该目录打开 Hello-Hexo.md 文件,为其添加标签和分类

1
2
3
4
5
6
---
title: Hello Hexo
date: 2018-12-27 11:57:40
tags: [Hexo]
categories: [Hexo]
---

然后可以随意写一些内容(需要使用MarkDown语法),之后可以先启动本地的 hexo 服务器,查看最新的修改内容是否成功显示。执行 hexo server 然后用浏览器访问 http://localhost:4000

可以在文章的任意部位添加下面的代码,发布后就会变成“阅读全文”按钮

1
<!--more-->

  • 部署最新的修改内容

在 hexo 目录下依次执行:

1
2
hexo clean
hexo d -g

然后浏览器访问https://userName.github.io 查看你的最新修改吧!

  • 将最新配置同步到 git 远程代码仓库

注意此时需要保持在 build 分支,先执行git status 查看本地分支与远程分支的差异(比如更改了哪些、新加了哪些、删除了哪些等等)然后执行以下命令提交最新修改的文件:

1
2
3
4
git add <your modified filenames>   //执行多次git add 直到把所有改变都add完
git status //查看是否已经处理完所有分歧
git commit -m "<your commit message>" //提交commit请求
git push //将commit同步到远程仓库

到此为止,一个看得过去的博客站点就算初步建立了,基本可以满足喜欢写写东西记录生活、写写笔记记录学习经历的同学了。。如果还想做一些个性化的修改可以期待下一篇文章使用GitHub Pages 与 Hexo 搭建个人博客站点(二)